Search the Community
Showing results for tags 'wallmount'.
-
Version 1.0.0
18 downloads
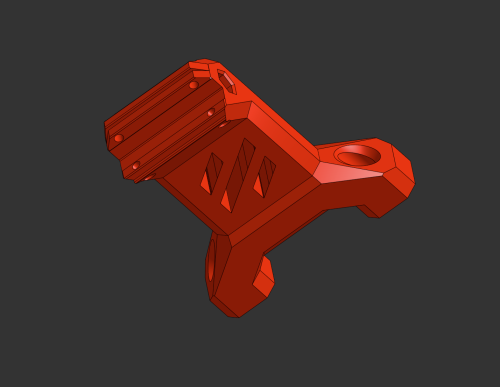
-------------English/Englisch------------- Hey everyone! I whipped up this wall mount for my Voron 2.4 because I was tired of all the vibrations while printing. Plus, it keeps the printer from sliding around at high speeds. So far, it’s been awesome! What It Does: Flexible Use: You can mount it in any orientation. No need to mirror anything in your slicer – just print it 2x or more, depending on how many mounts you need. Cable Pass-Through: A lot of folks hide cables in the aluminum profiles, but that gets tricky when you want to screw something onto them. So, I added a cable slot to this mount – just run the cable through there. (You might need to re-crimp it, though.) Maybe for Other Printers: I made it for the Voron 2.4, but it could work with other printers using 2020 aluminum extrusion, like the Trident. Give it a shot and see! Testing Phase: I’m currently testing it on my Voron 2.4, and it’s making a real difference. Less wobble, the printer stays put, and I think it’s even a bit quieter (since the vibrations go straight into the wall and get “swallowed” there). Print Tips: Filament: I printed mine in ASA (had some leftovers lying around). ABS or PETG should work fine too. PLA might do the job with a few extra wall loops. Layer Height: I went with 0.2 mm – works for me. Infill: I used 40%, but if your printer’s on the heavy side, maybe bump it up a bit. Supports: Shouldn’t need them, except maybe at the wall interface area. If so, just keep Supports on printbed only. The cable slot has some light bridging, but it’s no big deal – you can add support for better quality if you want, but it’s barely necessary. Assembly Tips: After printing, grab 4 rotating T-nuts and 4 M3x10 screws per mount and slide them into the profile. For my setup, I placed the mounts on the left and right at the back, about 25 cm from the top of the printer. Tighten them up properly (with the 4 bolts), then mark the drill holes on the wall (use a center punch or hole marker). Drill the holes into the wall and add anchors. (Depending on your wall type, you might be able to screw straight in.) Thanks to the mount’s shape, you can easily get to all the holes and screws If you want, use the cable slot to run a cable through (like for build chamber lighting, for example). -------------German/Deutsch------------- Hi zusammen! Ich hab diese Wandhalterung für meinen Voron 2.4 gebastelt, weil ich die Schwingungen beim Drucken loswerden wollte. Außerdem hält sie den Drucker fest, damit er bei hohen Geschwindigkeiten nicht verrutscht. Bis jetzt echt top! Was sie kann: Flexibel einsetzbar: Du kannst die Halterung in jeder Orientierung verwenden. Es muss beim Druck also nichts gespiegelt werden. Einfach 2x oder öfter drucken, je nachdem wie viele Halter du benötigst. Kabeldurchlass: Viele Nutzer verstecken Kabel in den Aluminiumprofilen. Das Problem ist dann, dass die Kabel im Weg sind, wenn etwas an die Profile angeschraubt werden soll. Ich habe daher einen Kabeldurchlass mit in die Halterung eingefügt, damit man das Kabel dort einfach durchführen kann. (Möglicherweise muss man es jedoch neu Krimpen. Vielleicht auch für andere: Ich hab die Halterung primär für den Voron 2.4 erstellt, aber sie sollte theoretisch auch bei anderen Druckern mit 2020er Aluminiumprofilen funktionieren, z. B. dem Trident. Einfach mal ausprobieren! Testphase: Ich teste sie gerade an meinem Voron 2.4, und sie macht echt einen Unterschied. Weniger Wackeln, Drucker bleibt stabil und meines Erachtens sogar etwas leiser (da die Schwingungen direkt in die Wand übertragen werden und dort “geschluckt” werden. Druck-Tipps: Filament: ich habe sie in ASA gedruckt (hatte noch ausreichend “Rest” da. ABS oder PETG sollten auch Funktionieren. PLA möglicherweise mit ein paar mehr Wandschleifen auch. Schichthöhe: 0,2 mm hab ich genommen Füllung: Ich habe 40% verwendet, aber bei schwereren Druckern vielleicht mehr reinpacken. Stützen: Sollten nicht notwendig sein (bis auf den Bereich des Wandinterfaces. Wenn, dann nur auf dem Druckbett. Der Kabelschlitz hat so kleines Bridging, dass es nicht notwendig ist. Für Bessere Qualität kann man es natürlich mit Support drucken, aber es sollte wie gesagt nur wenig support notwendig sein. Montage-Tipps: Nach dem Druck dann einfach je Halter 4 rotierende Nutensteine (T-nuts) und 4 M3x10 Schrauben verwenden und in das Profil einführen. In meinem Fall habe ich die Halter links und rechts an der Rückseite positioniert, ca 25cm von der Oberkante des Druckers. Hier die Halter dann richtig Festschrauben (mit den 4 Bolzen) und die Bohrlöcher an die Wand übertragen (Körner oder Bohrloch-Marker) Die Löcher dann in die Wand Bohren und mit Dübeln versehen. (Je nachdem was für eine Wand ihr habt, könnt Ihr jedoch direkt reinschrauben) Durch die Form des Halters kommt man an alle Löcher / Schrauben bequem heran Wer will kann dann auch die Kabelführung verwenden um dort ein Kabel (zum Beispiel für die Beleuchtung des Bauraumes) hindurch zu führen.


