Search the Community
Showing results for tags 'fan'.
Found 4 results
-

Version 1.0.0
19 downloads
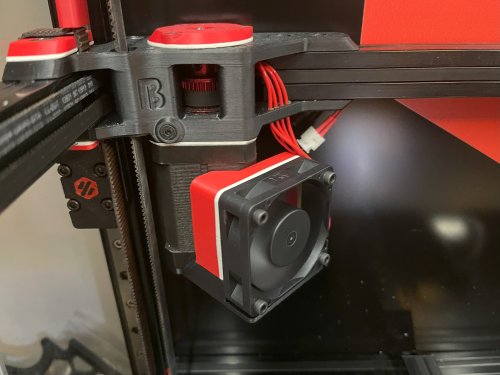
A Mount for installing a 5015 FAN ( like a SUNON MF50152V2-1000U-A99 ) with 40mm Hole Spacing to a 60mm Stepper Motor ( like the LDO-42STH60-3004MAC (S40) ) I tried using Double Sided Tapes and Magnets but neither of them were a reliable Solution so here's a Version that securely mounts it to the Stepper Motor without using the Stepper Motor Screws. BOM ( for a Set of two ) : 8x M3x4mm Voron Style Heat Set Inserts 8x M3x20mm Button Head Cap Screws 4x M3x12mm Button Head Cap Screws Print Instructions: The Parts come as Multi Color Parts for those that fancy it. I've used the usual Voron 0.2mm Layer Height, 4x Perimeter, 5x Top / Bottom Layers, and 40% Infill Settings which should work for anything using Heat Set Inserts. Perhaps use a Brim for the Air Guides since they barely make any contact with the Bed. Installation Instructions: Install two M3x12mm Button Head Cap Screws that will hold the Mount to the Stepper into the Fan Mount - It helps doing this while the Stepper has not yet been installed to gauge how far the Screws will have to be threaded into the Mount. Install the Voron Style M3x4mm Heat Set Inserts into both the Fan Mount and the Air Guides. Use the Fan to Assemble the Air Guides and Fan Mount into a unit using M3x20mm Button Head Cap Screws - Be mindful of a suitable Fan Cable Orientation that works for your Setup. Slide the Fan Mount onto the Stepper with the Screw closest to the Fan catching onto the Stepper Motors Bottom Plate first, then rotate the Mount so that the rear Screw will catch as well. ⚠ Caution ⚠: This was tested with a Chaoticlab CNC Tap V2.0 and no MicroSwitch Endstop Mount attached to it! ( Sensorless Homing! ) This AddOn may not work with any X-Carriers having Parts occupying the space below the X-Axis Extrusion as the FANs now partially do! -
Version 1.0.0
138 downloads
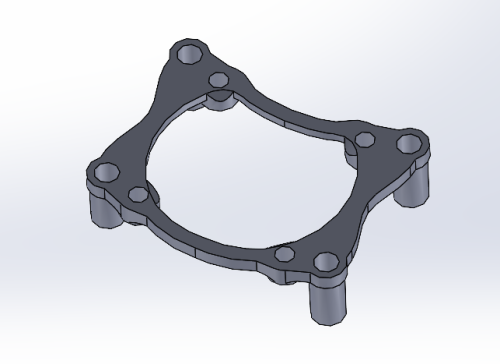
40mm fan mount for the BTT CB1 Heatsink. I suppose it would work without the heatsink as well, when slicing, just sink the part through the build plate far enough so that the standoffs are on the same plane. Uses Voron standard heatserts for mounting the fan. Uses stock heatsink screws to mount the part. -
Version 1.0.1
482 downloads
This is a remix of Demosth's excellent Skirt Fan Mount. I found the stock fan mount to be flimsy and easy to break off the extrusion. Demosth's version is a lot better but still only uses a single screw. I also wanted to use my red fan grills for extra flair. I added three additional features: 4 more holes to secure the mount to the extrusion any way you want (if using the outer most holes, you'll need to attach the mount to the extrusion first before attaching the fans and grills). You can still only use a single screw to mount it on the extrusion if you're feeling lucky, but I recommend using at least two. 3mm through holes to allow using custom fan grills (just as on the stock fan mount, you'll need to add heat inserts to the fans). Side profile for a snug and elegant fit against the part A and B side skirts, adds to the overal sturdiness of the assembly. This version is provided in 3 variants: Solid_Skirt_Fan_Mount_Channel: with profile walls and cable channel Solid_Skirt_Fan_Mount: with profile walls, no cable channel Solid_Skirt_Fan_Mount_Open: without profile walls on the side. (no idea why you'd want this one) All models are watertight and print as normal. No supports needed.- 5 comments
-
- 16
-

-

-

-
Version 1.0.0
23 downloads
Bed fan mount for the V0. Uses an 80x80x25mm fan, I used this GDSTime one. It makes the enclosure heat up faster, and the bed cool down faster after prints. Fan definition: [fan_generic enclosure_fan] pin: PB8 max_power: 1.0 shutdown_speed: 0 cycle_time: 0.01 hardware_pwm: False kick_start_time: 0.1 off_below: 0.2 Klipper macro for preheating the enclosure: [gcode_macro PREHEAT] gcode: M140 S110 ; Preheat bed M104 S160 ; Preheat hotend M106 S255 ; Part fan at max {% if 'xyz' not in printer.toolhead.homed_axes %} G28 ; Home axes {% endif %} G0 X60 Y60 Z110 F5000 ; Move bed down and AB to middle M190 S110 ; Wait for bed to hit 110 SET_FAN_SPEED FAN=enclosure_fan SPEED=1 If you use this, make sure to also turn off the enclosure fan in the PRINT_START: SET_FAN_SPEED FAN=enclosure_fan SPEED=0 Klipper macro for cooling down the bed after the print ends: [gcode_macro COOLDOWN] gcode: {% if printer.toolhead.position.z < 110 %} G0 Z110 F3600 {% endif %} TURN_OFF_HEATERS SET_FAN_SPEED FAN=enclosure_fan SPEED=1 M106 S255 ; Part fan to max [gcode_macro PRINT_END_COOLDOWN] gcode: M400 ; wait for buffer to clear G92 E0 ; zero the extruder G1 E-4.0 F3600 ; retract filament COOLDOWN {% set max_y = printer.configfile.config["stepper_y"]["position_max"]|float %} G0 X60 Y{max_y} F3600 M190 S50 ; Wait for bed to cool down (note: will heat to 50) M190 ; Turn off bed ; Turn off fans SET_FAN_SPEED FAN=enclosure_fan SPEED=0 M107