Jump to content

Search the Community

Showing results for tags 'eletronics'.

  • Search By Tags

    Type tags separated by commas.
  • Search By Author

Content Type


Forums

  • TeamFDM
    • Site Updates and Announcements
    • Frequently Asked Questions
    • General Discussion
    • Voron User Mods
    • Filaments
    • Build Diaries
    • Introductions
    • Tutorials
  • Voron Build Support
    • Voron 0
    • Voron Trident
    • Voron 2
    • Voron Legacy
    • Voron Extruders
    • Voron Electronics
    • Slicers and Print Troubleshooting
  • Other FDM Printers
    • Ender 3 / Ender 3 Pro
    • Anet A8 / AM8
    • Prusa
    • Generic / Other
  • Marketplace
    • The Bazaar
  • Vendors
    • KB-3D
    • Voron Printed Parts Co.
    • Fabreeko
  • Off-Topic
    • Random
    • TeamFDM Member's Creative Collection

Categories

  • Non Printable Files
  • Printable Voron User Mods
  • Manuals and PDF Guides
  • Creative Collection
  • Tools and Calibration
  • Official Voron Releases

Categories

  • User Mod Installs
  • Build Techniques
  • Programming
  • Team FDM Site Tutorials
  • CAD / Fusion 360 Tutorials

Blogs

  • Voron General
  • Why we are the best digital marketing services in Chennai

Find results in...

Find results that contain...


Date Created

  • Start

    End


Last Updated

  • Start

    End


Filter by number of...

Joined

  • Start

    End


Group


About Me


Voron Serial #1


Voron Serial #2


Voron Serial #3


Voron Serial #4


Voron Serial #5


Voron Serial #6


Voron Serial #7

Found 1 result

  1. Version 1.0.0

    17 downloads

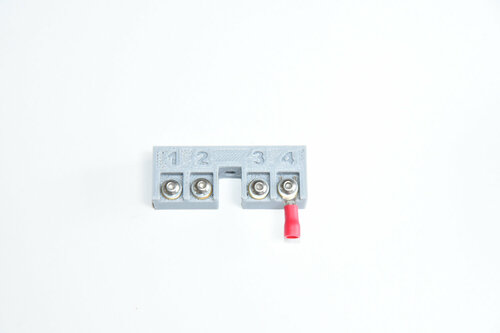
    My designs I have done for high power rocketry bays led me to design connector blocks specialized for that environment. I have taken one of my older designs and remixed it to mount as a right angle four post block for signal and fan wiring. I do like the WAGOs but only for AC/Mains. This block gives you four isolated posts in a space that fits into a extrusion rail with a M3 hammerhead nut. Printed Part 4_post_Wiring_Block_M3_rail Other parts four M3 thermal inserts one M3x12 screw for mounting block one M3 hammerhead T-nut four M3x6 pan head or button head non-oxide screws (shiny) four M3 internal lock washers eight M3 brass washers You can use spade terminals or wrap a loop of wire between the brass washers. Personally, I would use a spade terminal for the controller connection and just strip off the ends of the fan wires, twist them together and wrap it around the post. When a fan goes bad, replacement would be the easist this way. Of note, I have the panels from Printed Solid shown in the picture. The block is only 12mm high, so it can fit against the panel for use in the electronic section.
×
×
  • Create New...