Search the Community
Showing results for tags 'din'.
Found 8 results
-

Version 1.0.0
463 downloads
I'm in the middle of my build and mounting my MeanWell LRS 24V and didn't like the options I found which predominantly seemed to be horizontal with the DIN rail. I wanted something turned 90 and clipped to both DIN rails so I modified the ones from the 2.4 Fusion file to work. I'm still quite new to Fusion so somethings not working for you on it let me know but I've already printed and mounted on my power supply where they snuggly hold it in place. -
Version 1.0.0
284 downloads
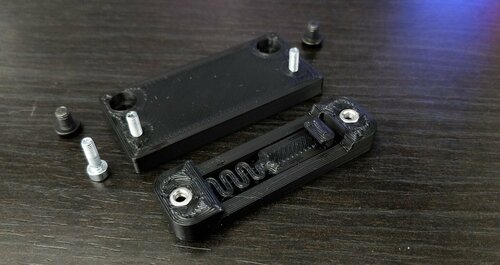
I wanted to use Demosth's Stiffer DinMount for my PSU, but as I had ran out of self tapping screws and didn't want to wait for new ones to be delivered I modded his design slightly to accept M3 screws and nuts. Because the spacing between the screw holes would not fit the PSU's mounting holes center-to-center distance without interfering with the spring design, I added a very simple base plate which bolts onto the PSU using M4x6 screws. Assemble the DIN bracket onto the base plate first, then the base plate onto the PSU. These mounts are for PSUs with mounting holes 50mm apart center-to-center. The tolerances of the holes are tight, so your printer has to print with dimensional accuracy or the screws won't fit. If too tight for your printer, try using Hole Horizontal Expansion in your slicer. Photo sample printed with 0.3mm layer height, 0.5mm width, 7% infill, complete set of 4 in about 37mins. No supports needed. Hardware: M3x10 SHCS x 4 M3 nut x 4 M4x6 BHCS x 4 -
Version 2022.04.21
397 downloads
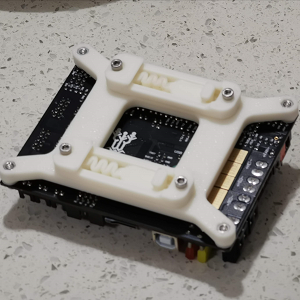
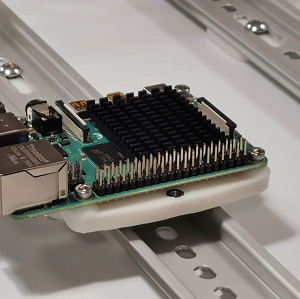
G'day, another nice thingy from down under. Got non-standard electronics compartment? Some blocks there that don't allow spec placements? Don't have or don't like self-tapping screws? Or are you just up to better wiring and sturdier construction? Alright, Dropbears to rescue. Here comes a rigid bracket for Raspberry Pi, that uses M3 bolts and nuts, and allows mounting along and across the rail. The bracket needs 1 of rs25_psu_bracket_clip.stl. (now included on the download) Printing and Plastic Standard Voron part printing guidelines to follow: 0.4 nozzle, 0.2 layer height, etc. This part is not exposed to any significant heat, so you could probably use even PLA. Assembly BOM: 6 x M3 hex nuts 6 x M3x12 SHCS screws Pi has mount holes for M2.5 bolts, so putting M3s through might be a problem. Just enlarge these holes with 3.0mm or 3.2mm drill, you won't damage the Pi but will make your life easier. Credits that russian guy (aeresov#9959) A Team Dropbear Production- 4 comments
-
- 4
-

-
- v2.4
- raspberry-pi
- (and 3 more)
-
Version 2021.05.02
27 downloads
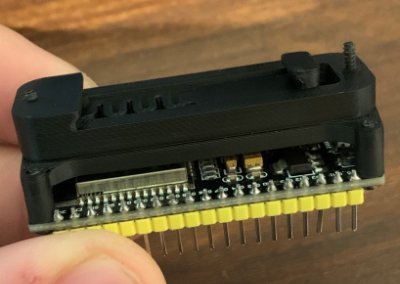
This is a DIN rail bracket for an ESP32 bought from AZ-Delivery via Amazon May also fit for other ESP32 dev boards, but I have not tested. The spacing for the bores is: 23mm x 51mm Please use the generic PCB DIN Clip and mount these on top. -
Version 2020.08.25
5 downloads
Please use the generic PCB DIN Clip and mount these on top. -
Version 2021.05.02
26 downloads
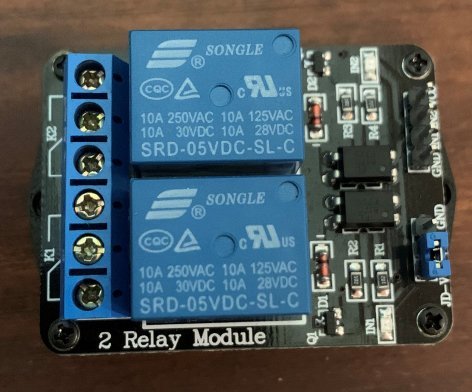
This is a DIN rail bracket for an 2-channel relay bought from Amazon May also fit for other 2-channel relays, but I have not tested. The spacing for the bores is: 33mm x 45mm Please use the generic PCB DIN Clip and mount this on top. -
Version 1.0.0
35 downloads
G'day, another nice thingy from down under. Got non-standard electronics compartment? Some blocks there that don't allow spec placements? Don't have or don't like self-tapping screws? Or are you just up to better wiring and sturdier construction? Alright, Dropbears to rescue. Here comes a rigid bracket for SKR boards, that uses M3 bolts and nuts, and allows mounting along and across the rail. Each bracket needs 2 of rs25_psu_bracket_clip.stl. Printing and Plastic Standard Voron part printing guidelines to follow: 0.4 nozzle, 0.2 layer height, etc. This part is not exposed to any significant heat, so you could probably use even PLA. Assembly BOM: 8 x M3 hex nuts 8 x M3x12 SHCS screws Credits that russian guy (aeresov#9959) A Team Dropbear Production -
Version 1.0.0
120 downloads
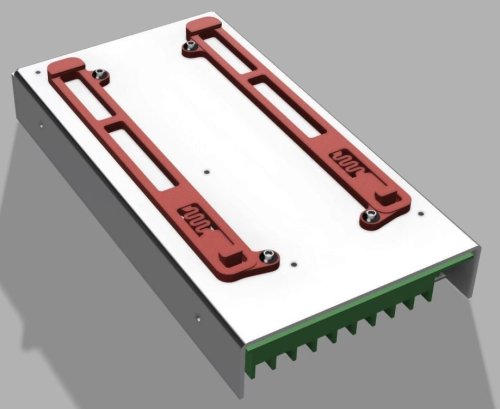
G'day, another nice thingy from down under. MeanWell UHP PSUs are great: nice, slim, compact, mains and DC on opposite sides... Well, but how to mount them on DIN rails? Alright, Dropbears to rescue. Pick an adapter for your UHP (they have different width), print 2 of them and 4 of rs25_psu_bracket_clip.stl. Printing and plasic Standard Voron part printing guidelines to follow: 0.4 nozzle, 0.2 layer height, etc. This part is not exposed to any significant heat, so you could probably use even PLA. Assembly BOM: 8 x M3 hex nuts 8 x M3x12 SHCS screws 4 x M3 suare nuts 4 x M3x10 SHCS screws Put square nuts in slide pockets, secure them with screws, then bolt down rs25 brackets, so square nuts are trapped. Credits that russian guy (aeresov#9959) A Team Dropbear Production


.thumb.jpg.1d984cefa4277697d8fb7de97c93eb2f.jpg)