Search the Community
Showing results for tags 'Fiction'.
Found 5 results
-

Version 2021.12.21
682 downloads
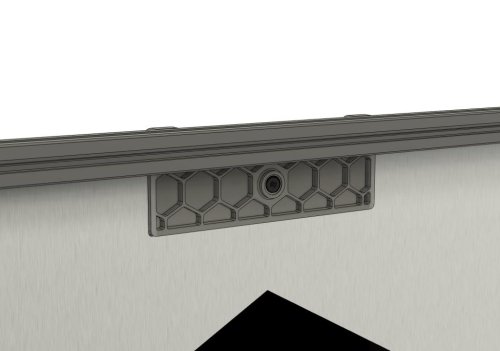
Exhaust cover The STLs will work with 3mm foam (compressed to 2.5mm) but other thicknesses are possible Design influenced by https://github.com/VoronDesign/VoronUsers/tree/master/printer_mods/falo/magnetic_grill_cover Fiction#5826 on Discord -
Version 2021.12.21
198 downloads
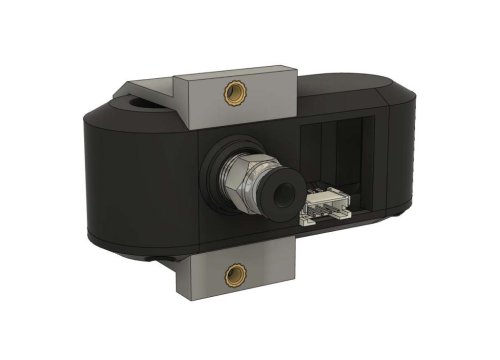
C270 mount Top-front mount for a Logitech C270 camera, based on https://github.com/VoronDesign/VoronUsers/tree/master/printer_mods/Koios/C920_Mount The mount uses the pin and screw from the stock camera's arm, and the front of the camera is removed in order to use the focusing ring. Fiction#5826 on Discord -
Version 2021.12.21
379 downloads
Voron V2.4 exhaust cover and BTT Smart Filament Sensor mount The STLs will work with 3mm foam (compressed to 2.5mm) but other thicknesses are possible The same cover without the filament sensor mount https://github.com/Autocrit/VoronUsers/tree/master/printer_mods/Fiction/Exhaust_cover Design influenced by https://github.com/VoronDesign/VoronUsers/tree/master/printer_mods/falo/magnetic_grill_cover BTT Smart Filament Sensor wiring The supplied cable works as-is with the Fysetc Spider V1.1; I'm using it on Y-MIN which is PB13. A longer cable might be required in which case a 4-pin JST PH 2.0 connector is needed for the sensor end, and a 3-pin JST XH connector for the control board end. Fiction#5826 on Discord -
Version 2022.01.17
332 downloads
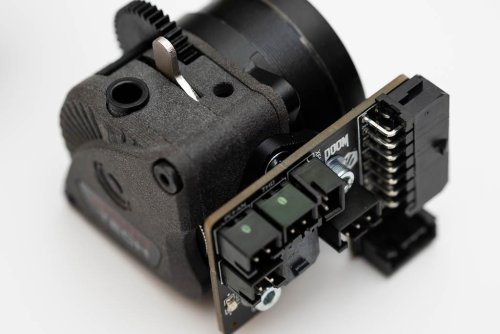
LGX Lite toolhead PCB mount Use with Mrgl-Mrgl's LGX Lite and cable chain mounts https://github.com/Mrgl-Mrgl/VoronUsers/tree/master/printer_mods/Mrgl-Mrgl/LGX_Lite_Mount Tested with version 3.2 of the toolhead PCB https://github.com/VoronDesign/Voron-Hardware/tree/master/Afterburner_Toolhead_PCB Fasteners 2 x M3x5x4 threaded inserts (the standard Voron M3 threaded inserts) 2 x M3x8 countersunk socket head screws to attach the toolhead PCB mount to the LGX Lite body side (with square nuts installed) 2 x M3x8 socket head cap screws to attach the toolhead PCB to the mount (use plastic washers) 2 x M3 plastic washers Notes install the threaded inserts from the flat side of the mount. This will leave some plastic between the threaded insert and the PCB to prevent damage to traces etc use the spacer or washers between the mount and the LGX Lite body to avoid interference with the gears Images Fiction#5826 on Discord -
Version 2021.12.21
0 downloads
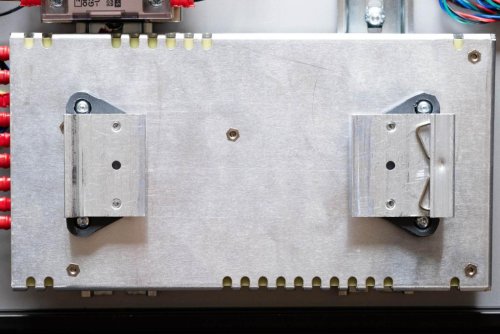
Crossrail Crossrail is a railway construction project underway mainly in central London. Its aim is to provide... Crossrail is a printed adapter for RSP-200-24 or LRP-200-24 power supplies and DRP-03 brackets. It allows the power supply to be mounted securely across the rails (or vertically as it's sometimes called). The alternate part crossrail_slot is the same mount but with slots to allow 10mm adjustment in either direction Bill of materials 2 x DRP-03 DIN rail power supply plate (Mouser, Digikey, Time, Ebay, powersuppliesonline.co.uk etc). These need to be cut to create one fixed end and one sprung end. I used a chop saw but a hacksaw or grinder would work too. File or deburr the cut edges if needed. 8 x M4x6 socket button head screws 2 x crossrail.stl or crossrail_slot.stl (or one of each) Notes For crossrail.stl the DIN rails need to be spaced 120mm apart centre-to-centre (that's a 85mm gap for 35mm rails). crossrail_slot.stl has 10mm adjustment in either direction to allow for different rail spacing (although the rails should still be parallel). Images DRP-03 before cutting and in normal use 2 x DRP-03 after cutting crossrail.stl crossrail_slot.stl Insert 2 M4x6 screws for power supply and fix to DRP-03 Same for the other DRP-03 Screw to the power supply