
-
TeamFDM.com is an UNOFFICIAL companion site for the DIY Voron 3D printer community. For official docs and final source of truth, visit the Official Voron Discord or the Voron Github
Creative Collection
Have a non-printer related file you would like to share? Submit that here! Files submitted in this category will also automatically create a Forum Post for discussion on the Creative Collection forum section.
Guidelines:
- It should be something of a personal nature, toys, unique tools, novelty items, fun stuff or art. No printer mods and such, there is already a place for that.
- It should be something you successfully printed
- Please Include the STL file and print instructions if applicable. CAD files if you feel its relevant.
- Write a little something about the story behind it and include pictures or other media to make the page lively
Unless otherwise specified follow the team communities GPL3.0 Licensing.
6 files
-

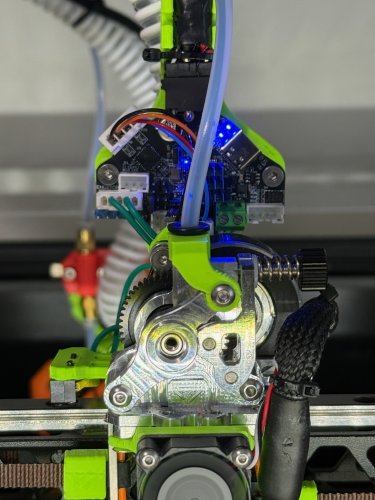
RR_Toolhead-1.0_V-Core_3 for Beacon Rev H
If you have a RatRig V-Core 3.1 and want to upgrade to the new Toolhead 1.0, you'll need to print the 3 STL's included in the ZIP file.
I created these components because the folks at RatRig provided STL's for the V-Core 3.1 but only work with a Pinda probe setup and nothing for the Beacon probe. So, I took V-Core 4 files and modified them to work on a V-Core 3.1.
You'll still need to print the belt clips and adjusters along with the CAN mount and replace the Front, Back and Duct parts with mine. These files have been modified to use the RatRig V-Core 3.1 belt system where the belts are tensioned at the toolhead versus the V-Core 4 that tensions the belts at the stepper motor mounts.
6 downloads
(0 reviews)0 comments
Submitted
-
EBB36 Cover with VZBot logo and motor Cutout
Wanted a cover for the EBB36 Canbus board on the VZBot - modified the file from Printables (Voron Logo) with a VZBot logo and cutout for the motor as the board mounts behind the motor.
Printer: VZBot 300 with aluminium printhead and EBB36 mount.
10 downloads
(0 reviews)0 comments
Submitted
-
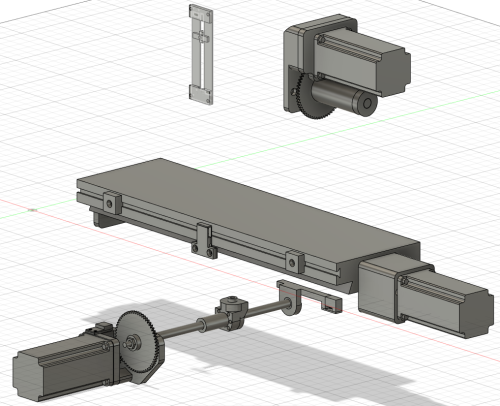
Mill: Ball Screw + CNC Upgrade
Description
I have always wanted to play with a CNC mill, and I finally got around to converting my manual mill in the garage. It's been fun using the skills I've learned from building my voron 2.4 and my quad copters over the last couple of years, and challenge myself to design and build my own project.
With what is provided in these files, I've been able to get my precision down to around .001 inches. If I continue to tweak this design, I believe I can tighten this up just a bit more, but this is fine for my current home shop. The current setup with CNCjs running on the raspberry PI isn't my favorite, and I've looking into switching over to another headless web app called gSender at some point in the future. For now, I find myself bypassing the raspberry PI altogether and running Universal Gcode Sender from laptop to execute the gcode on the controller.
I've also been using Fusion 360 to generate the milling gcode. I'm still honing my skills here, but it's has not been terrible to learn.
I've only attached the Fusion 360 design files for the conversion. Fusion 360 is free for personal use, so you can easily install the software, isolate the part you would like to make an STL for, and export it from the Fusion 360 software. I have placed an asterisk (*) in front of each of the part names to indicate the part needs to be printed. Parts with no asterisk are either hardware that need to be purchased, or original parts of the mill.
This build was done specifically for the Harbor Freight version of this mill, but there are several almost identical clones it can likely be used on:
Harbor Freight Round column 2hp mill drill Ru Fong RF-31 Grizzly G0705 Jet JMD-18 Enco 105-1110
BOM
I have only provided links for items I purchased for this project. I have not provided links for items I already had on-hand):
General
Filament for printed Parts (ASA): https://www.amazon.com/dp/B09DKR3BTG?psc=1&ref=ppx_yo2ov_dt_b_product_details Zip ties Electronics
Aviation Connector Kit (8 pin): https://www.amazon.com/dp/B07D7TZJB6?psc=1&ref=ppx_yo2ov_dt_b_product_details Aviation Connector Kit (4 pin): https://www.amazon.com/dp/B07D7SHKGK?psc=1&ref=ppx_yo2ov_dt_b_product_details Mega-2560 Terminal Block Cap: https://www.amazon.com/dp/B08LH8SVBB?psc=1&ref=ppx_yo2ov_dt_b_product_details Nema Enclosure (20"x16"x8") https://www.amazon.com/dp/B0924BN1P5?psc=1&ref=ppx_yo2ov_dt_b_product_details AC Plug: https://www.amazon.com/dp/B07DCXKNXQ?psc=1&ref=ppx_yo2ov_dt_b_product_details 110v AC -> 12v DC power supply: https://www.amazon.com/dp/B078RY6YY3?psc=1&ref=ppx_yo2ov_dt_b_product_details 12v DC -> 5v DV power supply: https://www.amazon.com/dp/B0BNQ9XXCZ?psc=1&ref=ppx_yo2ov_dt_b_product_details Enclose Fans: https://www.amazon.com/dp/B08BLTW8RX?psc=1&ref=ppx_yo2ov_dt_b_product_details Fan Covers: https://www.amazon.com/dp/B097BH493D?psc=1&ref=ppx_yo2ov_dt_b_product_details Raspberry Pi Fan: https://www.amazon.com/dp/B092YXQMX5?psc=1&ref=ppx_yo2ov_dt_b_product_details AC Rocker Switch: https://www.amazon.com/dp/B07S914SFB?psc=1&ref=ppx_yo2ov_dt_b_product_details Mega-2560: https://microcenter.com/product/621387/arduino-mega-2560-rev3-256kb-(8kb-after-bootloader)-flash-memory Raspberry PI 4 Model B: https://microcenter.com/product/637834/raspberry-pi-4-model-b-4gb-ddr4 Stepper Kit w/ Drivers: https://www.amazon.com/STEPPERONLINE-Stepper-1699-34oz-4-1-8-2A-24-80VDC/dp/B0C7QH7K1T?ref_=ast_sto_dp Stranded 22AWG stranded wire Heat shrink Soldering consumables If using end stops: 8 wire cable: https://www.amazon.com/dp/B09J7TCFYQ?psc=1&ref=ppx_yo2ov_dt_b_product_details MR30 male and female cable ends 3 Pin Micro Switches: https://www.amazon.com/URBESTAC-Momentary-Hinge-Roller-Switches/dp/B00MFRMFS6 Inline Aviation Connector (8pin): https://www.amazon.com/dp/B08CN5BFWD?psc=1&ref=ppx_yo2ov_dt_b_product_details DB15 (VGA) Connector: https://www.amazon.com/dp/B09J7TCFYQ?psc=1&ref=ppx_yo2ov_dt_b_product_details
Mechanical Hex Head Screws (M6): https://www.amazon.com/dp/B0B5NW3T9B?ref=ppx_yo2ov_dt_b_product_details&th=1 Hex Head Screws (M8) Motor Coupler: https://www.amazon.com/dp/B0991B657G?psc=1&ref=ppx_yo2ov_dt_b_product_details
vBearing (10x22x6): https://www.amazon.com/dp/B07FVX92MJ?psc=1&ref=ppx_yo2ov_dt_b_product_details Bearing (12x24x6): https://www.amazon.com/dp/B07FW3983N?psc=1&ref=ppx_yo2ov_dt_b_product_details Thin Nut (12x5): https://www.amazon.com/dp/B0BJ6ZRFMR?psc=1&ref=ppx_yo2ov_dt_b_product_details Thick Nut (12x10): https://www.amazon.com/dp/B09F5NRW8Y?ref=ppx_yo2ov_dt_b_product_details&th=1 Ball screw (DFU1605 RM1605 420mm): https://www.amazon.com/dp/B08NH59F2K?psc=1&ref=ppx_yo2ov_dt_b_product_details Ball screw (DFU1605 RM1605 800mm): https://www.amazon.com/dp/B08NH59F2K?ref=ppx_yo2ov_dt_b_product_details&th=1
Tools Used
Battery powered drill Hole saws HSS drill taps (m3) 3D printer (Voron 2.4) wire strippers Phillips head screw drivers Soldering Iron Heat Gun Multi-meter Fusion 360 (CAD software)
Build out
I listed these steps in the order I built the project, but I'm sure this completed differently
Enclosure drilled holes for fans, power connector, power switch, encoder wiring, and stepper wiring laid out the pattern for where I wanted my electrical equipment 3D printed mounts for the equipment drilled and tapped holes for mounting electronics installed the fans, aviation through hole connectors, power supplies, motor drivers, raspberry pi, mega-2560 installed grbl/mega onto the mega-2560 installed CNCjs on raspberry pi wired everything up tested motor movement
Mill (I tackled each axis 1 at a time) Printed all parts for the axis installed the ball screw conversion (not application for the Z axis) the nuts were backwards from what I wanted so I printed a generic 1605 mandrel to flip the nut attached the gears/coupler motor mount cap installed the motor
End stops These are still a work in progress, but I have successful attached the z axis stops
Print Settings
Resolution: .2 Infill: 60% Filament brand: Polymaker Filament color: Grey Filament material: ASA
12 downloads
(0 reviews)0 comments
Submitted
-
VzBot Goliath Fan Duct with Beacon Probe Mount
This is a slightly modified part cooling fan duct for the VzBot CNC toolhead with Goliath hotend. I do believe this will also work with other hotends such as the Phaetus Rapido.
The mod is a very simple one where I partially filled in the lightening holes in between the horns. This helps with printing and adds a little more structure without dramatically increasing the weight.
173 downloads
(0 reviews)0 comments
Submitted
-
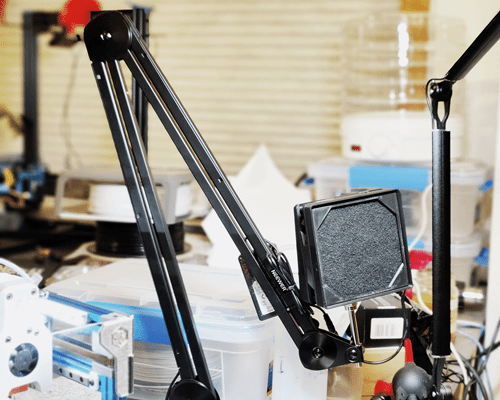
Arm-mounted soldering fume dissipater
I have a small work space and a lot of crap. I got tired of doing the safety squint version of avoiding breathing soldering fumes so I wanted a fume extractor. I don't have room for a real fume extractor and I don't really do that much soldering, so wanted something that could be folded out of the way when not in use and not take up any desk space. An arm-mounted fume fan that pulls fumes through an activated charcoal filter seemed like a good solution so that's what I built:
Yes there are versions of it available on amazon, but I wasn't happy with them so I bought an extra long flex arm and a 120mm fan with a variable speed controller. Of course I make no guarantees that this is fit for any purpose including protecting your health, you're on your own there. I'm pretty happy with how this turned out though. It keeps the fumes out of my face and folds out of the way when out of use. I hope you find it useful.
BOM
flex arm with 5/8" mounting bolt at the end 120mm x 120mm x25mm fan with power supply 8x neodymium magnets, rectangular 20mm x 5mm x 1mm 5/8" hex bolt activated charcoal filter 4x m3x35mm BHCS 4x m3 4.5mm x 4mm threaded inserts (voron standard ones are 5mm in diameter, these are from adafruit) Printed Parts
There are three printed components
The screw mount that attaches the whole assembly to the arm The filter holder that holds the filter and is the front half of the sandwich around the fan The filter retainer that keeps the filter in with the power of magnets Assembly
It's a pretty straight forward build that you can probably figure out, but here's the main steps:
1) Add the heat-set inserts into the four corner holes in the screw mount, and insert the 5/8" hex nut.
2) Glue the magnets in to the recesses of the filter holder and filter retainer parts. It's a good idea to set all the magnets in the filter holder to one polarity and all the magnets in the filter retainer to the opposite polarity.
3) Cut a roughly 115mm square piece of filter material of your choice
4) After the glue/epoxy is set use the m3x35 screws to pass through the filter holder, 120mm fan, and into the inserts in the mount.
5) Insert the filter and then use the filter retainer to hold it in.
Notes
The flex arm I got has a channel so the cord could be concealed inside the arm itself to keep it out of the way. It's a nice feature I suggest you look for.
The fan I got supposedly goes up to 2700rpm and is super quiet even at full speed so I'm not sure the speed control is necessary.
3 downloads
(0 reviews)0 comments
Submitted
-
(0 reviews)
0 comments
Updated


-
Most Actively Discussed Mods
-
Hottest Files!
.thumb.jpg.2c879d60315f8d86612bb06a137c204a.jpg)
