
-
TeamFDM.com is an UNOFFICIAL companion site for the DIY Voron 3D printer community. For official docs and final source of truth, visit the Official Voron Discord or the Voron Github
Printable Voron User Mods
Voron User Mods, or "UserMods", are a collection of community created and Team FDM curated modification for Voron Printers. All of these mods are available on the VoronUsers Github repo and unless otherwise specified follow the Voron communities GPL3.0 Licensing. Use any Mods at your own risk, if you make modification please share them on the VoronUsers repo.
Mod Authors: Have a Voron mod? Upload it at TeamFDM.com and let us know you're the author. We will ensure you can update and curate your files for more feedback! Please include tags for what Voron, or extruder your mod is compatible with.
652 files
-

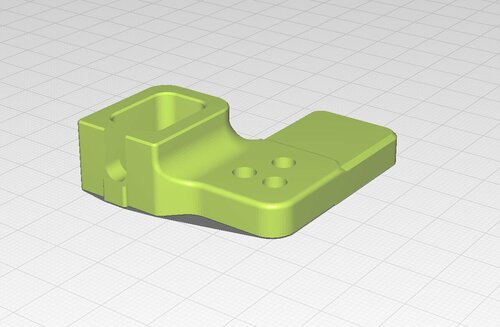
Voron Z chain lower mount with vertical riser
I have a Voron 2.4 - 350. The Z cable chain's first link did not lock at 180 degrees. This caused the chain to curve backwards. I re-mixed this version from the original that has a vertical riser than keeps the cable chain straight. Works great.
71 downloads
-
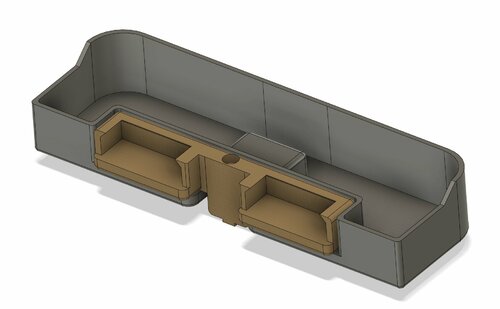
Large Nozzle brush: Two brushes and a large container - Voron 2.4 350
Here's a large nozzle scrubber and container for a Voron 2.4 - 350.
I have the 3 point bed mounting kit from Mandala Rose Works. It raises the bed about an inch. I included the STEP files if you want to modify for your printer.
This works great. The container mounts with magnets. I modeled in 3 magnets on each side. I only installed 2 on each side (4 total) and it's plenty strong.
The container is large enough where I can park the toolhead over the container for filament changes and the filiment that come out will land in the bucket.
326 downloads
-
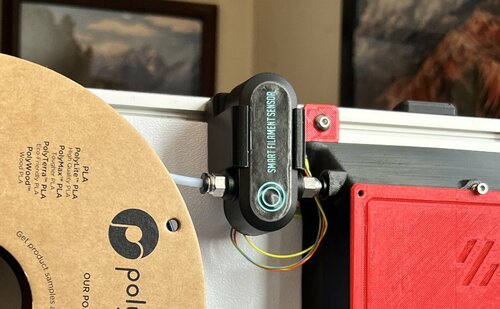
Smart Filimant Sensor Mount for voron 2.4
Here's a mount for the Bigtreetech smart filament sensor mount. I mounted this on the back of my Voron 2.4. Note I have an exhaust vent that exits out the side. This is so I can fit the big Voron on my desk.
BTT_Sensor_Mount v1.step BTT Filament Sensor Mount v1.stl
88 downloads
-
V0 Lazy Removable Clamp Hinges (V2.4/Trident compatible)
This is a hybrid of two excellent hinge mods that I very haphazardly slicer-spliced together. I have zero CAD skill, all credit for the design of the originals goes to their respective owners.
I'm just a lazy dude that wanted a little bit of each of these hinge designs for my V0, and I couldn't find it online. So I took these two great ideas and frankenstein'd them together in superslicer to make this ugly abomination that I find quite useful and painfully easy to assemble. It's Alexander T. Moss's brilliant clamping hinge idea combined with this amazing removable doors mod by ElPoPo. I literally just swapped the hinge attachment points of either part and merged them in my slicer before re-exporting. I did the same to the hinge mounts, but with the slot-in tabs for a 1515 extrusion.
The only reason I even bothered to post this is for the odd chance that someone is less motivated than myself and also looking for something similar. Alas, this is now the path of least resistence.
I recommend using double-sided VHB tape on the smaller back half of the clamps to get a more reliable grip on your panel. If you don't add that, you'll spend more time fussing with it to stay put than you will care to, I learned this from personal experience.
The "click and print" files are pre-arranged build plates of the parts you need.
The v0 version has all 6 parts layed out so they can fit on a 120mm v0 build plate.
The V2.4/Trident version has the minimum 12 parts layed out and pre-mirrored for a left and right door on a larger printer. They should all fit on a 180mm buildplate
if you want to DIY-print these parts the hard way:
you will need 2x V0 door mounts and hinge assemblies for the V0
you will need 4x door hinge mounts for the 2020 extrusion. If you use ElPoPo's original 2020 door mounts (which I have included here purely for convenience) then these spliced clamp hinges will also work on the trident or V2.4, the front part of the hinge will need to be mirrored to mount the doors on the left side of a larger printer. you'll need at least 2x hinges for each door.
https://mods.vorondesign.com/detail/uS9PdDxZtFj4MWLRzNXUyA
https://mods.vorondesign.com/detail/WqhhKrXksAZ4omhHS1RY4Q
664 downloads
-
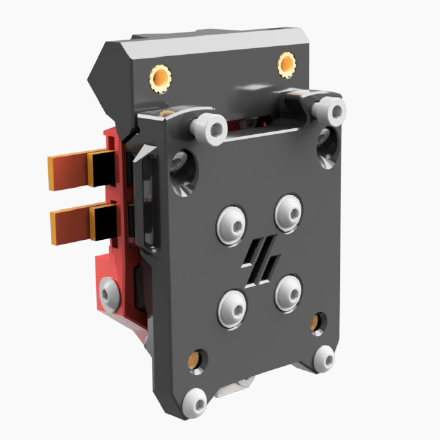
Mini SB X carriage with Euclid probe mount for Voron 2.4 single MGN9 rail
After the Mini SB release, i realy like the light format and i whant to use it in my Voron 2.4 setup. This is work in progress so feel free to explore...
295 downloads
(0 reviews)0 comments
Submitted
-
Modified Eytecz Front_body_LGX_Lite_Stealthburner_ERCF_PCB
This is a modified version I made to adapt this for use with a 2 part hartk PCB. I pretty much eyeball modified this and be warned it does NOT fit perfectly. You will still have to trim some plastic by hand to get the connector for the 2 PCBs to fit.
39 downloads
-
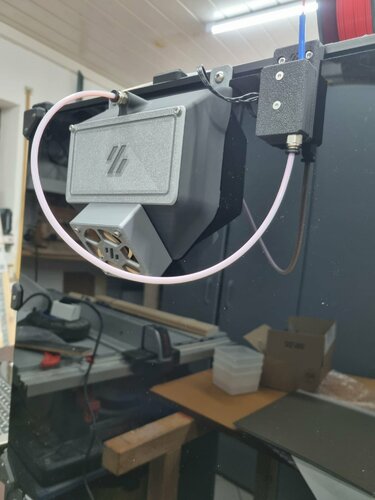
Air Filter HEPA + Activated Carbon + CanBus ERCF wiring + Stealth
Burst from Discord Voron asked my if I can do an update of my old "HEPA + activated carbon Air filter mod" for his new machine:
he wanted wiring for CanBus and ERCF
I made it and added some "stealth" to it.
Work in progress...
This is based on Fanny Pack Air Filter. I dont know who made it originally.
1,042 downloads
-
Simple filament sensor
For my Voron I used a simple filament sensor. Since the simple ones that can be bought only have a sheet metal strip for scanning, there was always the problem after a runout that the filament wedged itself in the sensor when it was pushed back. So I made one that uses a roller actuated micro switch. The original is designed to mount to the back of a Voron that has a 3mm backplate and 3mm tape. In order to make it a little more universal, I have uploaded a version with a separate mounting distance, which you can simply use in the slicer in height.
In addition to the printed parts you will need:
1 roller-actuated microswitch, e.g. Link
1 JST-XH, 2.54 male, e.g Link
1 Pushfit M10x1, e.g. Link
2 self-tapping screws M2x10
I printed the whole thing in ASA carbon, but in principle you can also use PLA, PETG or whatever
- After printing, it is recommended to clean the filament hole with a 2mm drill so that the filament slides through nicely
- It is advisable to fix the JST connector with a drop of superglue before soldering
- I wired the switch as an "opener", if you need a closer then just use another pin.
- After assembly, check whether the switch is actuated by the filament, if not you have to correct the roll bar a bit, I found that the switching points on the linked switches vary slightly
283 downloads
(0 reviews)0 comments
Updated
-
voron0.1螳螂头改蚊子voron0.1 Mantis head changed to mosquito
voron0.1 Mantis head changed to mosquito
零件7.STL
6 downloads
(0 reviews)0 comments
Submitted
-
voron2.4r1改r2 z电机脚垫 z drive baseplate
VORON2_v2.4_Assembly v4.stlVORON2_v2.4_Assembly v3.stl
8 downloads
(0 reviews)0 comments
Submitted
-
Voron Stealhburner door for BTT EBB36
On my Voron 2.4r2 i have an BTT EBB36 v1.2 installed. Since the board is mounted on the back of the LDO Nema 14 stepper behind a ClockWork 2 the cables came extremely close to the drag chain when homing. Also the wires were exposed on the Stealthburner.
I've remixed the door to have my Stealthburner encapsulated and shielded off in the back. This way i still can use the door and have everything safe and shielded. For ventilation and esthetics there is a cutout on the back of the Voron logo. I've included the EBB36 v1.2 mount, spacers and the drag chain anchor (3 holes, i don't have a 2 holes file) so you can create the same setup.
The door needs to be printed with support, mounts don't need supports. Printed mine in eSUN ABS+ Black with 110c for bed temp and 245c for hotend temp.
EDIT: I forgot to include the standoff/spacers, see attached files
spacer_17mm_2.stl spacer_17mm.stl
407 downloads
-
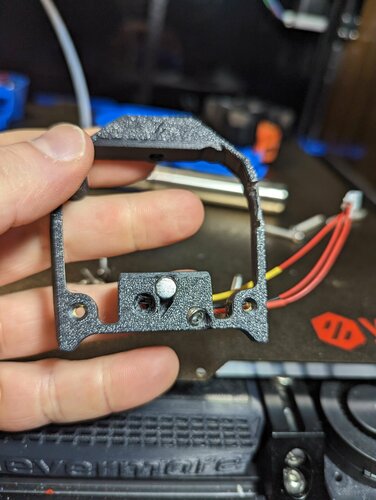
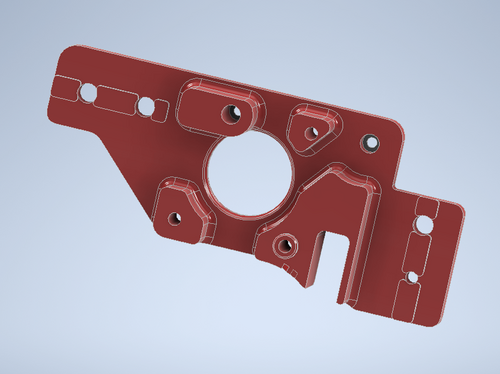
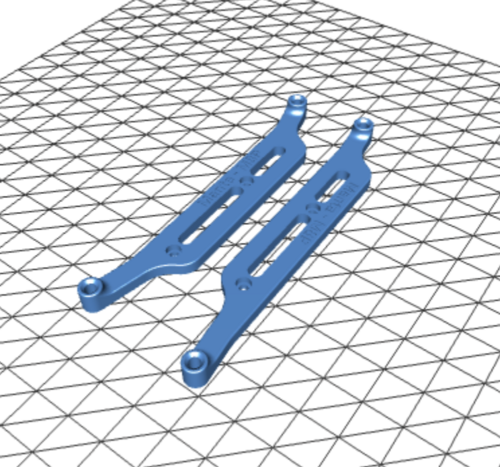
Trident Pinmod Gantry A/B Drive Units modification
As I'm currently swapping to hartk1213's pinmod I was wondering why A/B Drive Units have different Pin length (28/30mm). when looking at his STL's I saw the reason that one pin is secured against vertical down-movement by adding a 2mm stop, but not the 2nd what made no sense to me.
So I got his Step and looked to the specific lower A/B plates, but the.step doesn't correspond to the downloadable STL's as there are no stops in the .step parts?
Anyway, I decided to modify to have both pins secured and made 2 versions: 2 times 5x28mm or 2 times 5x29mm pins per side. so for both sides 4 pins are needed!
The 29mm Version makes more sense to me as the pin has 4mm guidance in the unit and I think 1mm stop to secure the pin should be enough.
I found the pins at Aliexpress: https://www.aliexpress.com/item/32769265211.html
126 downloads
-
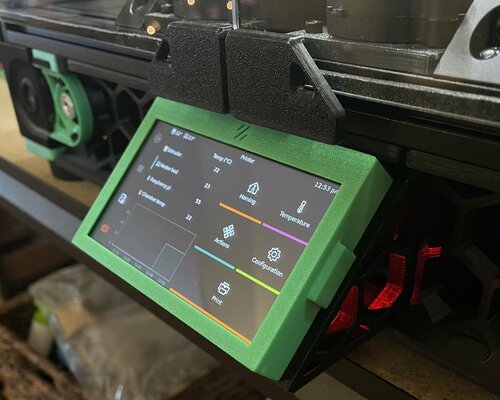
45 Degree Mount for PI TFT43 4.3" Display
I couldn't find a mount that fit the PI TFT43 screen so I remixed another design to fit and designed a bezel.
Print with normal Voron settings, no supports needed.
205 downloads
(0 reviews)0 comments
Submitted
-
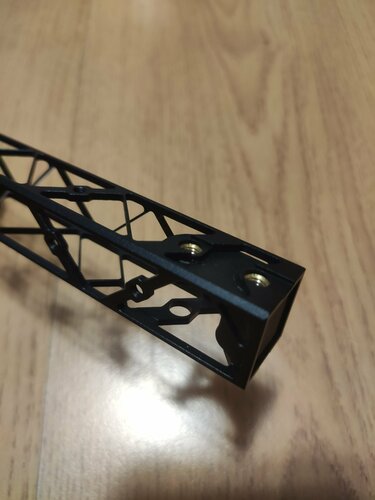
Light X beam mounting block
This is my design of mounting block for light X beam. It should work on both aluminium and carbon fiber versions, but make sure that inner dimension of beam is 16x16mm.
Required hardware:
6pcs M5x7x5 brass heatset insert
335 downloads
-
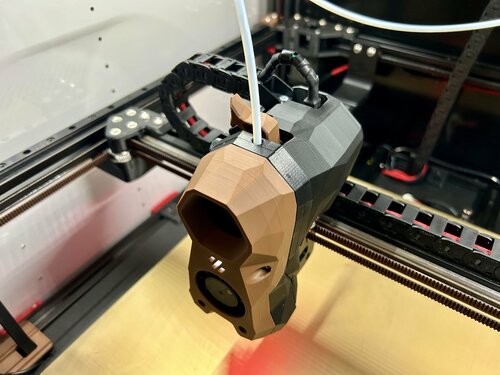
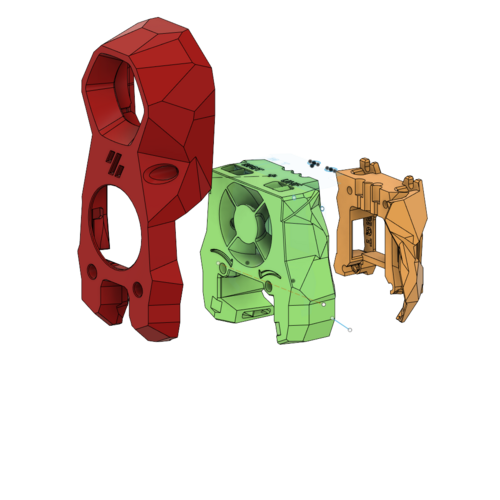
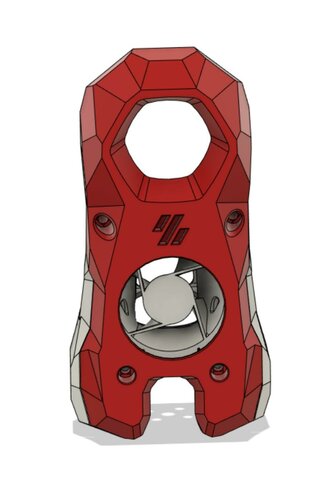
Stealthburner for Mosquito Magnum with Phaetus UHF Adapter
This is a modified Stealthburner to fit a Mosquito Magnum hotend with a Phaetus UHF Adapter/nozzle. Fan duct to Nozzle Clearance is 1mm. Included are files for 2 mounting options. and the front cover that will fit. The usual side by side mounting, and the probably not very used at all diagonal mounting. Requires 2 heatset inserts. Then you install the screw from the bottom. Let me know if it works for you, or if it needs adjusting.
452 downloads
(0 reviews)0 comments
Updated
-
Exhaust Fan Cover
I didn't like the open design of the fan, it looked even more stupid with the beige Noctua fan. So I created a cover for it, maybe you like it too and you want to dress up the fan. I uploaded a 20mm variant for the standard fans and a 25mm variant for Noctua
72 downloads
(0 reviews)0 comments
Submitted
-
Holder for gantry camera
Since the camera perspective at the front above offers a good overview but you cannot see what is happening at the nozzle, I looked for a solution for a second camera. Since the Voron is designed to be quite space-saving, it wasn't easy to find a free corner. I then found a camera circuit board with a USB connection on Amazon that can also be extended.
Here's a link to the camera, hope it's OK here: Link
Make sure that longer cables are shielded, otherwise you will have connection problems.
I used self-tapping screws to screw it on
151 downloads
-
Voron Tap R1
Tap is a drop in replacement for the X carriage which includes a nozzle probe mechanism. For Voron Trident and V2 printers
Bill of Materials
Category Qty Description Notes Hardware 1 50 mm MGN9 Rail see cutting guide, Ends deburred, overall length +/- 1 mm Hardware 1 MGN-9H Carriage Medium preload (Z1) is preferred, but regular preload will work. Carriage must be removable from rail. Hardware 2 6 mm x 3 mm magnet 6 mm diameter, 3 mm tall cylinders. N52 strength preferred, N35 or higher strength required. Hardware 11 M3 Heatset Insert Standard Voron spec 4.7 mm diameter inserts Hardware 1 H3 Hex Nut ISO 4032 Hardware 6 M3 Washer DIN 125, 7mm outer diameter, 0.5 mm thickness Hardware 2 M3 x 20 SHCS Socket head cap screw Hardware 2 M3 x 16 SHCS Socket head cap screw Hardware 1 M3 x 12 SHCS Socket head cap screw Hardware 3 M3 x 8 SHCS Socket head cap screw Hardware 1 M3 x 6 SHCS Socket head cap screw Hardware 2 M3 x 6 FHCS Flat head cap screw. MUST BE MAGNETIC. No stainless, may be black oxide or zinc coated. Hardware 2 M3 x 10 BHCS Button Head Cap Screw Hardware 10 M3 x 6 BHCS Button Head Cap Screw Sensor Options: Select either “Wired Sensor” or “PCB Sensor"
Wired
Category Qty Description Notes Links Electronics 1 220 Ohm resistor ¼ Watt, +/- 10% tolerance resistor Electronics 1 OPB Wired Sensor Optek sensor, wired. OPB991 OPB991P51Z OPB991L51Z OPB991T51Z OPB991T11Z https://www.digikey.com/short/rrjtmvwm OPB991L11 https://www.digikey.com/short/cnnhjr5n PCB Sensor
Category Qty Description Notes Links Electronics 1 OptoTap v2 PCB Electronics 1 OPB PCB Sensor Optek sensor: OPB666N or OPB971N51 OPB666N https://www.digikey.com/short/f2mzw5rm OPB971N51 https://www.digikey.com/short/m9rz73fp
1,305 downloads
(0 reviews)0 comments
Submitted
-
Manta M8p Bracket
Bigtreetech Manta M8P Din Mounting Brackets
Designed to mount the Bigtreetech Manta M8P Controller Board.
Based on the Voron Octopus Mounting Brackets
Printing
Standard Voron part printing guidelines to follow: 0.4 nozzle, 0.2 layer height, etc.
Assembly
BOM: Size Qty M3x8 4 M2 Self-tapping Screw 2 PCB Din Clip 2177 downloads
- gerritwellen
- v2.4
- (and 1 more)
(0 reviews)0 comments
Updated
-
TophatExtractor
Voron V0.1 Tophat Extractor
Tophat Exhaust Fan with activated carbon and HEPA filters.
BOM
(the BOM is for upgrading from an existing Tophat)
1 pc. 60x60x25 Fan (preferably without80 downloads
(0 reviews)0 comments
Submitted
-
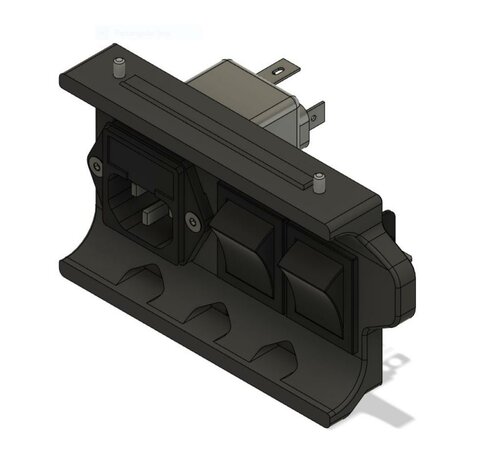
Trident Dual Power Switch
Trident dual power switch
This is a simple mod to allow mounting two switches along side the filtered inlet, rather than one.
The intention is to wire this so that the Raspberry Pi remains powered, even when the rest of the system is off
Hardware
This mod only works with the filtered inlet from the sourcing guide, not any of the all-in-one options.
It should work with any switch that works in the stock skirt, you just need 2 of them now.
34 downloads
(0 reviews)0 comments
Submitted
-
Stealthburner Rapido Uhf
Stealthburner Rapido UHF
A mod that stretches the Stealthburner Front and Rapido Toolhead Front for use with a Rapido UHF configuration. It moves the lighting and cooling to Stealthburner stock locations relative to new nozzle location. Designed from SB RC1 using this version.
No additional parts required. Assembly is as per Voron Stealthburner manual. You may need to increase the length of one of the LED wire legs.
497 downloads
- bythorsthunder
- v2.4
- (and 2 more)
(0 reviews)0 comments
Submitted
-
V2.4r2 Z Drive Motor Tensioner Mod Rear Skirts
V2.4 Rear Skirt Mod for Z-Drive Motor Tensioner Mod
Credit for the Mod goes to Edward Yeeks for the orginal design and Skohls for updating the mod for the R2 changes. https://github.com/VoronDesign/VoronUsers/tree/master/orphaned_mods/printer_mods/edwardyeeks/V2.4_z_drive_motor_tensioner_mod
This mod enables the you to utilize the rear skirts, power and keystone, in your V2.4R2 while still being able to use the Motor Tensioner Mod. NOTE: heat set insert holes are in a new location so you will have to reposition your bottom panel clips and hinges.
Printing
Default voron settings No supports needed BOM
Same hardware for mounting skirts for Voron V2.4r2.
347 downloads
(0 reviews)0 comments
Submitted
-
V0 Long Thumb Nut
Longer Thumb Nuts for Voron V0
After installing a Kirigami mount for my V0 bed, I found that the stock thumb nuts were too short, which made them very hard to adjust. I have also never been particularly fond of the shape of them and found them uncomfortable to adjust.
Usage
Print it, the standard Voron settings worked fine for me. Install 3mm heat set inserts to the bottom of the thumb nut (so that the tension will pull the heat set insert into the part, not out of it) Replace your stock thumb nuts Redo your bed leveling42 downloads
(1 review)0 comments
Submitted
-
Mount For Umbilical
Guide for an umbilical with top feed, no cable gland required
I added a toolhead board to my Galileo extruder, and the reduced wire-count suggests to move to an umbilical instead of an energy chain. It has been thoroughly tested with my Galileo and should work with Clockwork 1/2 or any extruder that offers the common anchor point for a 2- or 3-hole drag chain.
This mount guides a sleeved wire bundle. My own umbilical enters the chamber at the top, through the exhaust opening, and is supported by a gallows. What I needed and designed, is the matching steady mount on the extruder end.
This has no hardware requirements. Use your old fasteners to attach the guide to the anchor, mine are M3x8.
I put the wires into a standard polyethylene sleeve to protect them. For the length that runs down to the CAN-board, I used a heat-shrink, but that's general caution, not required for the mount.
The key gets pushed in from the top to steady the umbilical in the guide. One end of the key is a bit thinner to allow easy insertion. If the cable is still too loose with the key, you can zip-tie it to the key, I added slots for that.
Caution:
When you lock the umbilical with the key, make sure the length towards the CAN-board has a bit of slack. You don't want hard kinks in the cable!
Total perspective:
Front view:
Rear view:
Side view:
195 downloads
(0 reviews)0 comments
Submitted


4B_P.thumb.png.e4480e7fb8e1187f5e7d9622aab8b720.png)
DCHYLNCJ@V90.thumb.png.d5dfb03c9a8abad9dc2178f0f9f74d79.png)

-
Most Actively Discussed Mods
-
Hottest Files!
.thumb.jpg.2c879d60315f8d86612bb06a137c204a.jpg)

