
-
TeamFDM.com is an UNOFFICIAL companion site for the DIY Voron 3D printer community. For official docs and final source of truth, visit the Official Voron Discord or the Voron Github
Printable Voron User Mods
Voron User Mods, or "UserMods", are a collection of community created and Team FDM curated modification for Voron Printers. All of these mods are available on the VoronUsers Github repo and unless otherwise specified follow the Voron communities GPL3.0 Licensing. Use any Mods at your own risk, if you make modification please share them on the VoronUsers repo.
Mod Authors: Have a Voron mod? Upload it at TeamFDM.com and let us know you're the author. We will ensure you can update and curate your files for more feedback! Please include tags for what Voron, or extruder your mod is compatible with.
652 files
-

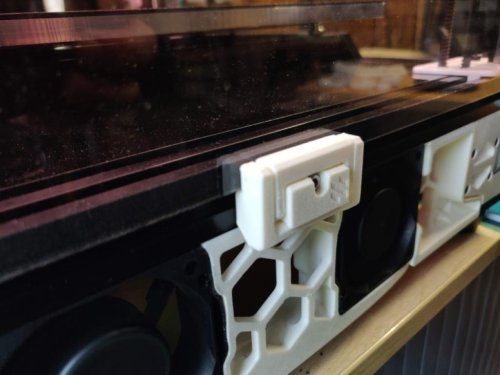
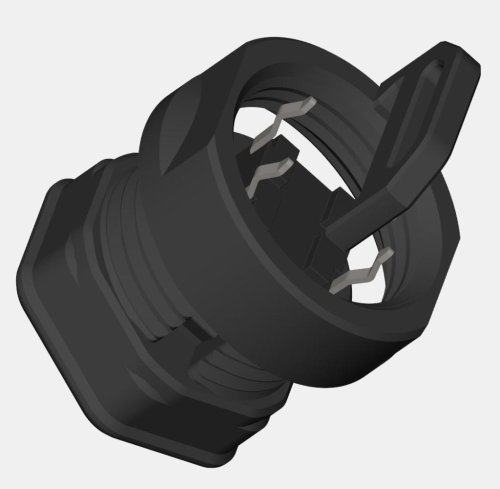
Snap Latch 2020
Printable quick release latch for panels on 2020 extrusion
This is originally inspired by a youtube video - https://www.youtube.com/watch?v=6p7M18oPn3k
Another user is creating cad and variants - https://github.com/v6cl/My-Voron2.4-Customs/tree/main/Panel_Locker
So why did you do it?
I wanted a variant with filament hinges I found it didn't put quite enough pressure on the panel and my attempts to moodify the cad failed Decided the best way to understand it was to design it Wanted adjustable4,657 downloads
-
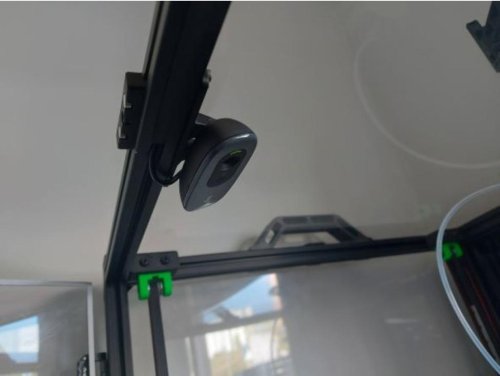
Logitech C270 Mount
Overview
These part is to mount the Logitech C270 webcam to the top center of the frame.
I use this extrusion profile cover to hide the cable (https://www.thingiverse.com/thing:1478147).
Requirements
1x C270/C310 Webcam
2x M3x8 SHCS
2x M3 T-nut
Screenshots
291 downloads
(1 review)0 comments
Updated
-
-
Cable Routing Z Belt Cover
Hidden cable routing z belt cover mod
Credit
Mod based on the design of the Voron crew. Thank you for your awesome work!
Print settings
As stated in the Voron documentation:
ABS 0.2mm layer hight 0.4mm extrusion width 40% infill wall count 4 top/bottom layers 5 no supports Bom
Only the printed file.
Improvement
Added the possibility to route cables on the bottom of the cover.
Description
I liked the design of the old Voron 2.2 covers more than the current design so I based my mod on them.
This mod allows to route cables that are hidden in the extrusions to the bottom compartment. To achieve that the inner part of the z belt cover is a bit thicker and a path is cut out on the bottom where cables can be routed. The overall dimensions are the same as the stock 2.2 covers.
Note: Be careful to restrict the cable in the bottom compartment so it does not rub on your z-belts.
Pictures
Top:
1,426 downloads
-
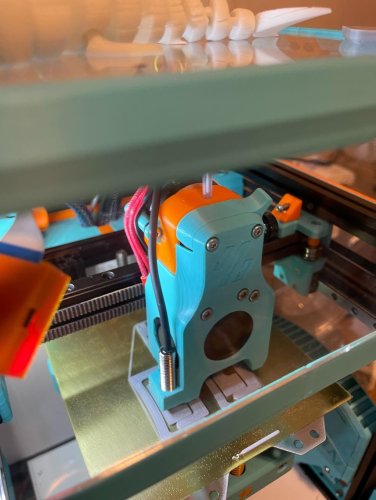
Lights Camera Voron
Lights, Camera Voron
Mounts for LED strip lights and a Pi camera on the V0.1.
Details
There are three parts: a normal rail for mounting just LED strips, a rail with a mount for a Picam, and a rail with two lugs for zip ties. Each rail is 80mm long, with the intention of using two rails on each side. If you only want to mount lights, print four of the normal rail. If you also want to mount a camera, print two of the normal rails, and one each of the camera and zip tie rails.
The rails work with 8mm wide LED strips.
Mounting the Picam using this mod is a tradeoff. It is in a relatively safe place, and provides an OK (but not great) view of printing. The camera covers most of the bed. Sometimes the mini Afterburner gets in the way of the view. Mounting the camera in the tophat would give a better view, but at the expense of needing to deal with the cable when removing the tophat. Here is an example view during a print:
Assembly
To install the rails, you'll need:
8x M3 hex or square nuts 8x M3x8mm screws To mount the Picam, you'll additionally need:
2x M2x6mm screws Insert the M3 nuts into the top of the top extrusions. This is pretty easy to do even after the printer is totally assembled.
Feedback
Feel free to contact me - I'm ademuri#2806 on the discord.
31 downloads
(0 reviews)0 comments
Submitted
-
Tridentified V2.4 Power Inlet
A Team Dropbear Production
Tridentified V2.4 Power Inlet - by @Amarpal89
Trident style side plug skirts for V2.4 to suit Edwardyeeks z-drive tensioner mod
These skirts are only compatible with Edwardyeeks V2.4 z-drive Tensioner Mod Found Here
250:
RightSkirt_250.stl PlugSkirt_250_*.stl Replace the plug panel and both stock rear skirts.
300
300 downloads
(0 reviews)0 comments
Submitted
-
TopHat Cam Extension
NoNutz™ TopHat Cam Extension for V0/0.1
This modification provides a tophat extension that adds 7mm in height to help clear the umbilical. It includes a fold-up webcam below the tophat. It does not require replacing any parts on the tophat itself and can be considered a
39 downloads
-
V01 Skirt Buttons
Voron 0.1 skirt buttons
Instructions
For each button you will need to print: 1x Nut.stl, 1x Lock.stl, 1x Button-.stl
Print with a 0.1mm layer_height (after the first layer) to improve the quality of the threads, Solder two wires toward the inside of the legs of a 5mm tactile switch, add some heatshrink, Push the 5mm tactile switch into the button housing and snap the locking piece behind, Install the button throught a hexagonal hole in the skirt and screw the printed nut behind, Optional, use the hole in the locking piece and a ziptie for attaching the cables (strain relief).
345 downloads
(0 reviews)0 comments
Submitted
-
Kirigami Bed Front
# V0 Kirigami Bed Front
Requirements
A fully installed kirigami bed: https://github.com/christophmuellerorg/voron_0_kirigami_bed Notes
This is the standard V0.1 bed front, adjusted for the excelent Kirigami bed. Secures with M3 nuts and SHCS.
57 downloads
(0 reviews)0 comments
Submitted
-
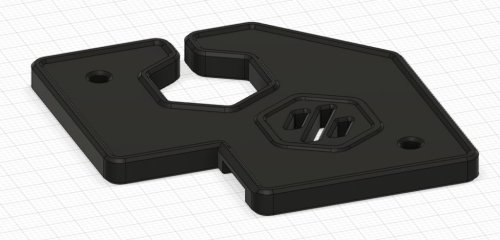
Ds18b20 Sensor Mount
DS18B20 Mount
Simple DS18B20 temperature sensor mount based on the z endstop mount.
BOM
1x DS18B20 / DS18B20-PAR 1x 4.7kohm resistor 2x M3x10 BHCS 2x M3 nuts 1x zip tie Instructions
Drill hole in rear panel for wires Solder/connect sensor, wires, resistor and 4x2 dupont connector Position sensor in hole Bend sensor leads and secure with zip ties Secure mount in place similarly to z endstop mount Setup Raspberry PI for 1 wire (see https://www.circuitbasics.com/raspberry-pi-ds18b20-temperature-sensor-tutorial/ for a good tutorial) Setup sensor in Klipper [temperature_sensor chamber] sensor_type: DS18B20 serial_no: sensor_mcu: rpi Note: you can also position the mount on the inner side of the z axis rails which looks better, but also potentially block access to the z axis for later maintenance.
Images
Example setup using a DS18B20-PAR:
30 downloads
-
CableGator
The CableGator!
The cable comb that takes a BITE out of dragchain frustration!
Why do I need this?
Keeping your wiring tidy as you're installing your dragchains can be a hassle, sometimes quite the croc!
Enter, CableGator!
The totally not reptilian overlord that gently combs your
71 downloads
(0 reviews)0 comments
Submitted
-
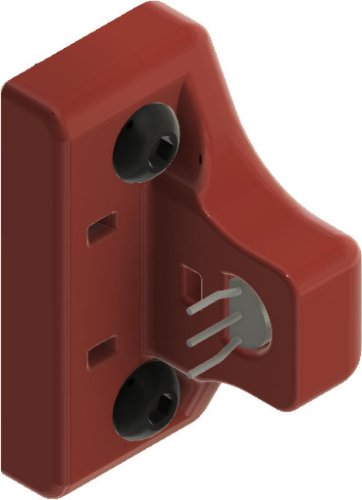
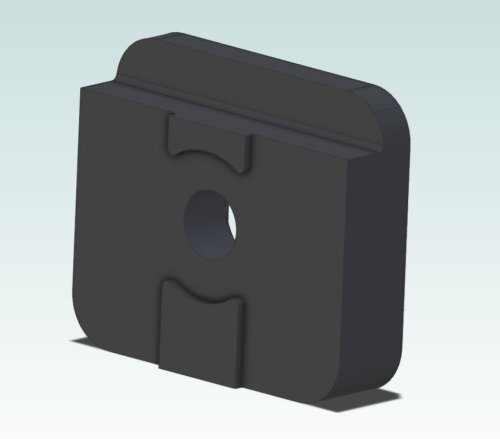
Z Carriage Stop Pass Through
Switchwire Z Carriage Stop Pass Through
This is a modified version of the z_carriage_stop that allows pass through of wires such as the Neopixel light bars.
This is a direct replacement for the stock z_carriage_stop part and does not require additional modifications or disassembly to be used.
51 downloads
(0 reviews)0 comments
Submitted
-
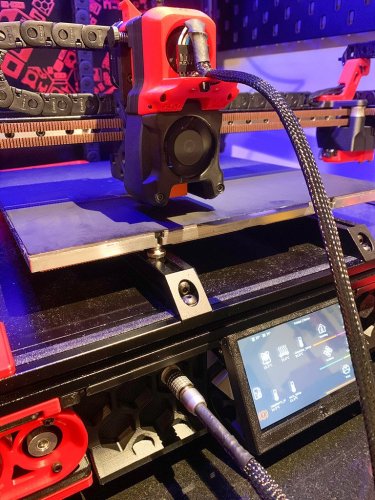
ADXL Mount - 2 Screw
Credit
This mod is based on the mod of
3DP MAMSIH Th3FalleN shared in voronuser_mods channel in discord: https://discord.com/channels/460117602945990666/635687829254701107/849006095430844427 or https://discord.com/channels/460117602945990666/635687829254701107/849035515802288158 Thank you for your awesome work!
Print settings
As stated in the Voron documentation:
ABS 0.2mm layer hight 0.4mm extrusion width 40% infill wall count 4 top/bottom layers 5 no supports Bom
2x heat insert m3 2mm wide zip-tie Improvement
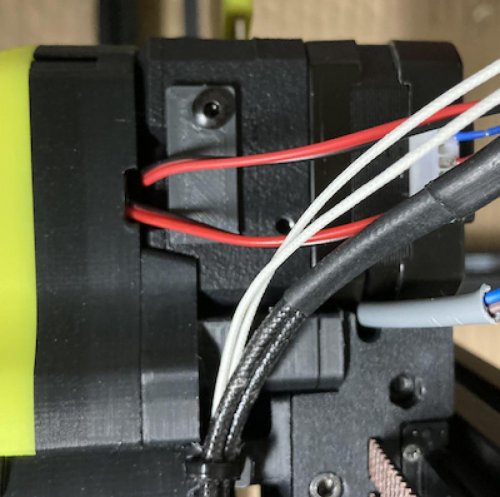
Added a cable strain-relief
Description
I really liked the adxl mount posted in the voronuser_mods channel by 3DP MAMSIH. Thanks to Th3FalleN it was modified to have heat-set inserts. I added the possibility to fix the cable to the mount, so it does not need to hang directly from the adxl pin headers.
159 downloads
(0 reviews)0 comments
Updated
-
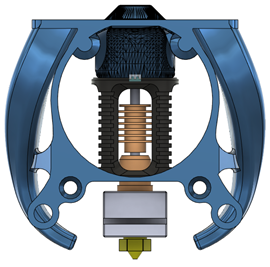
HaloDuct
Last update 11/13/2021
Quick author disclaimer: I am not a CAD expert, I have limited experience, but I manage to make functional pieces that I’m happy with.
Beta testing from a few Voron users have confirmed excellent results, as such I’ve decided to share this design. This duct is currently not officially VoronMods approved based on design criteria listed on the Voron Discord, however I continue work to make it compliant with Voron design principals.
Introducing the Halo Duct for the Voron Afterburner, this duct was created from my personal need to get better cooling during PLA prints.
Available versions:
Dragon v1.1 - weight 20.5 grams Dragon v1.1 with hotend ducting - weight 24.5 grams Mosquito v1.1 - weight 20 grams E3d-V6 v1.1 - weight 19.1 grams Goals for this duct were:
Adequate cooling to enable high speed PLA prints Directed airflow across the nozzle Lightweight design to limit ghosting Compatibility with stock Afterburner 2.4 fan assembly and some mods (5015) Compatibility with the Dragon / Mosquito / V6 Hotends Future goals:
Compatibility with other HotEnds VoronMods design principal(s) compliancy CFD tuning Recommended Printing guidelines:
Material – ABS or better 0.16 Layer height Supports under ducts (select supports for “touching build plate only”) suggest some part cooling - between 10-50% depending on your cooling setup 3 sec minimum layer time Support removal should be easy, no tools required: https://youtu.be/1iqqhB1m5gw
All testing was performed with a single 5015 fan, using the below Fan mod by Greg191134: https://github.com/Greg191134/Voron/tree/master/Afterburner%20Optimisation/5015%20fan%20mod
If you find my (Greg191134's) work helpful, or it's made life a bit easier, consider a tip/donation, it is appreciated, but not required: https://camo.githubusercontent.com/cd07f1a5d90e454e7bbf69d22ebe4cdbd3a0b3dcf56ba0b6c2495a8e99c776be/68747470733a2f2f6b6f2d66692e636f6d2f696d672f676974687562627574746f6e5f736d2e737667
465 downloads
- greg191134
- haloduct
- (and 5 more)
-
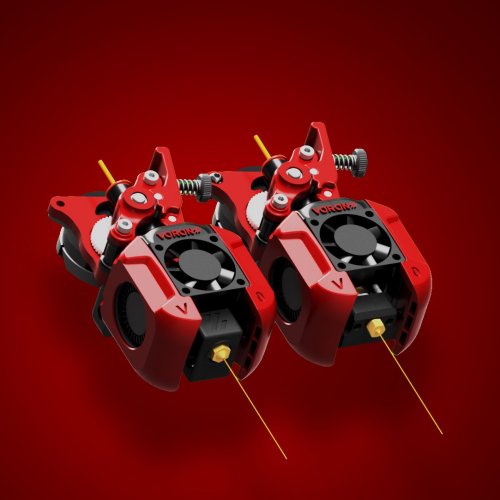
ABBN For Stock
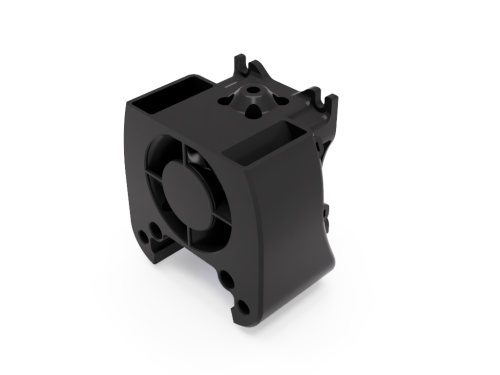
AB-BN for Stock
This is a revised Stock toolhead for the Dragon or Rapido hotend. It takes the technology from AB-BN and ports it for use with the stock Afterburner Assembly.
This allows you to use the stock Afterburner 4020 based part cooler and reduces the potential for jamming.
The only real use case I know of for this is for someone who does not have a 5015 fan.
Why?
The stock Afterburner was designed for a full size E3D V6 hotend. The Dragon uses a much smaller heatsink. The result of this is that the bulk of the airflow bypasses the heatsink on the Dragon.
In addition, the stock toolhead blows a lot of air onto the bed.
Finally, the stock ducts tend to melt and warp over time.
I also added support for Phaetus' Rapido toolhead.
How does this fix anything?
AB-BN was developed over the course of 2020 and 2021 to solve several issues with the stock afterburner airflow. Dozens of prototypes were modeled, simulated, printed, and tested. In the end I found that cooling was improved if we:
Use a cone to help streamline air exiting the fan. Use a stator to increase static pressure. Reduce the duct to force air past the heatsink This reduces the overall airflow and increases the airflow that matters to the toolhead.
I also included the bleed air channels that help reduce part duct melting.
Should I use this or the FULL AB-BN?
This solution is aimed at someone who wants to keep using most of the stock Afterburner, but needs a little less hotend jamming.
I recommend you use the full AB-BN if you can.
What toolheads are supported?
I have support for Phaetus' Dragon and Rapido toolheads.
For Dragon, you do not need a new back piece, the stock dragon back is fine.
For Rapido you will need both front and back pieces.
385 downloads
(1 review)0 comments
Updated
-
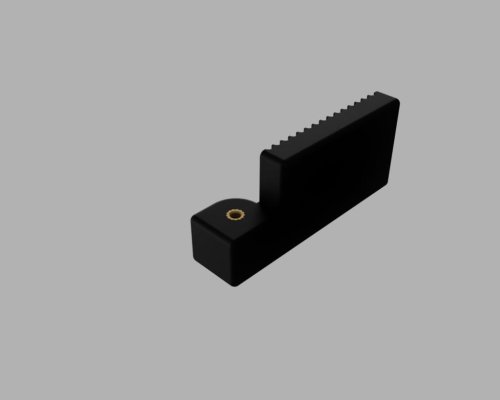
Quickdraw Probe Voron Switchwire
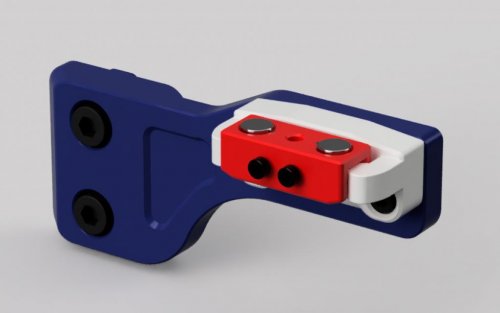
Quickdraw probe for Voron Switchwire
A Magnetically Coupled, Removable, Z Probe and Dock System inspired by the design from Annex Engineering and remade from scratch so it works better on the Voron Switchwire. Basically, the probe and dock has been designed so the probe detaches on the X-axis instead of the Z-axis, being easier on the magnets and so better reliability, whilst the dock arm has been improved by shaving 3mm of thickness, allowing for the docking coordinates to be at X250 and a better fit on the right vertical 3030 extrusion. A spacer is available if for some reason you need a bit of play in the dock coordinates and you'd only have to scale it to the right thickness.
The KeyBak mount has been modified so you can screw in a microswitch, allowing to home the Z axis prior to picking up the probe from the dock.
By using the dock, you will loose 27mm of X travel.
Here's a video of initial homing sequence with the probe docked and not attached to the toolhead : https://youtu.be/5mihNdWIw-k
For the dock arm, dock and probe you will find here, you'll need :
6x 6x3mm magnets Omron D2F-5 microswitch (recommended) 2x M2x12mm screws (magnetic) 2x M3x8mm SHCS 2x M5X12mm SHCS 2x M5 T-nut for 3030 extrusion 2x M3x5x4 threaded heat inserts You will also need the modified carriage that you can find, among other informations, at Annex Engineering : https://github.com/Annex-Engineering/Quickdraw_Probe
137 downloads
(0 reviews)0 comments
Submitted
-
10x11mm Chain VSW
Printable and openable 10x11mm chain
There are integrated support on the link and the end pieces that you'll have to remove before assembling. Just wiggle them slowly to remove them and trim away any remaining plastic.
I recommend setting Fill Gaps Between Walls to Everywhere in Cura.
127 downloads
(0 reviews)0 comments
Submitted
-
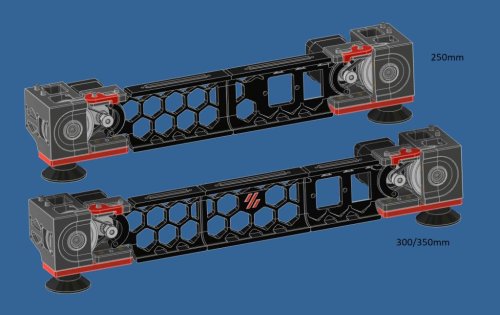
MGN9 Backers
MGN9 Extrusion Backer Mod
A mod to allow the installation of full length MGN9 rails on top of Y extrusions to combat thermal expansion on a V2.4. This is based on the discovery of bimetallic flexing caused by thermal expansion, by whoppingpochard, detailed here: Extrusion Backers
If the stock X rails are replaced with a single MGN12 rail (MGN12 Mod), that leaves two free MGN9 rails which can be used as backers for the Y extrusions. They do not fit stock as the spacing on top of the extrusion is smaller than on the bottom. This permits their installation without the need to cut them down.
Includes new Front Idler Uppers, new belt clips and a taller XY Cable Bridge.
100 downloads
- bythorsthunder
- v2.4
- (and 2 more)
(0 reviews)0 comments
Updated
-
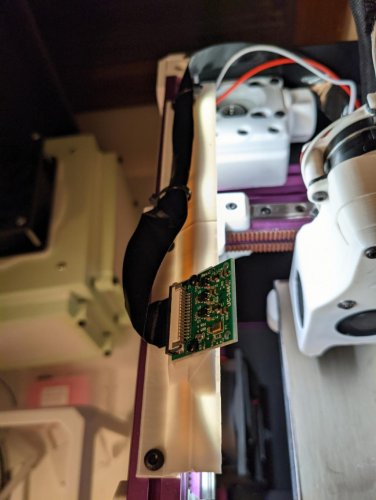
Afterburner LGX
Afterburner LGX
Useful links, info, and models for using the The LGX™ Large Gears eXtruder with Afterburner...
Afterburner LGX Mounts Klipper config Extra LGX Models LGX Cable Cover LGX Gear Cover LGX Lever Cover Afterburner LGX Mounts
Mounting the LXG to AfterBurner requires some additional mounting plates. You will need both of @Nemgrea's mounts from Discord:
lgx_AftB_Mount_Front.STL (Discord file link) lgx_AftB_Mount_Rear.STL (Discord file link) These models are pinned in the #voronuser_mods channel on Discord, and can be found in this message.
Thanks to @Nemgrea V2.199 V0.000 and the crew for their efforts designing and testing the mounts, and offering them to the community.
Aside: For my own build, I found that my third-party M3x20 screws had a large enough head that the toolhead couldn't mount to the X Carriage assembly properly without a bit more clearance. If you find yourself in this situation, this mod of @Nemgrea's mount is nearly identical to the one on Discord but with slightly more clearance for the bottom screws. Please try the (semi)official one first before using this mod 🙂
Klipper config
Bondtech has some official documentation for configuring Klipper here. Below is the configuration I am currently running.
rotation_distance: 8 microsteps: 16 full_steps_per_rotation: 200 # use either # gear_ratio: 44:14, 37:17 # rotation_distance: 55 # or # rotation_distance: 8 # but not both! The either...or warning is not from Bondtech, but provided here to honor the memory and sacrifice of my first hotend and save those that may come after from suffering the same fate...
Extra LGX Models
LGX Cable Cover
Besides the mounting parts, most people end up asking about a cable cover. There are a few posted around Discord, but after seeing Craxoor's PCB cover I designed a similar cover from scratch for use with the LGX. Note that this cover does not work with the toolhead PCB - it just looks similar.
lgx-cable-cover.stl
(Cereal not included)
LGX Gear Cover
A little cover for the Large Gears on the LGX so it doesn't chew through the fan wires.
lgx-gear-cover.stl
LGX Lever Cover
Drop-in replacement for the filament pre-tension lever, in case you want a different color:
lgx-lever-cover.stl
445 downloads
- geoffreyyoung
- v1.8
- (and 3 more)
-
Mgn12 Euclid
Afterburner MGN12 Carriage with Integrated Euclid Probe
Euclid Probe by nionio6915 (Github), https://www.euclidprobe.com/
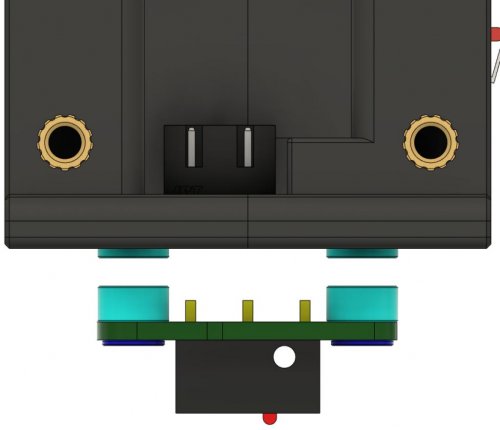
This is a modified version of the MGN12 carriage for a Voron Trident or modded Voron 2.4 with a cutout for mounting the upper Euclid PCB.
Other than requiring a Euclid Probe, the only additional parts needed for the MGN12 carriage are two M3 heatset inserts for mounting the upper PCB.
When installed, the Euclid's magnets should barely protrude from the bottom of the carriage.
The JST connector should be easily accessible from above
Probe Dock
The Euclid Probe project has Voron docks available on euclidprobe.com, under
72 downloads
(0 reviews)0 comments
Submitted
-
PanzerBalls2.4
What are Panzerballs?
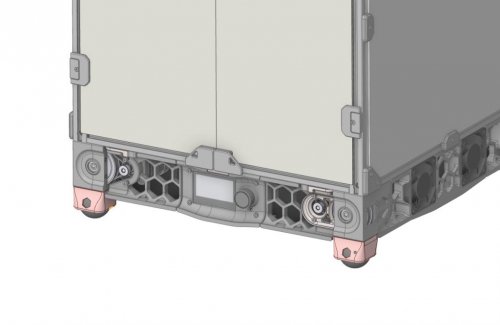
Panzerballs are another type of feet using commonly available squash balls. Why do they exist?
i hate sourcing of rubber compressor feet i felt that other squash ball mods do not satisfy me visually (sry) Why do i need Panzerballs?
You probably don´t need them unless you got problems with sourcing the normal rubber compressor feet or you want something more squishy with maybe a better noise reduction. How do i install Panzerballs?
Panzerballs are a drop in replacement for the base plate You need: 4x squash balls (super slow, double yellow dot, diameter 39.5-40.5 mm) o german source:https://www.decathlon.de/p/squashballe-sb-990-2er-pack-zwei-gelbe-punkte/_/R-p-312192 4x printed Panzerballs: o Use '01-Normal/[a]_PanzerBall_x4.stl' if you have not modded your z-Drive o If you use edwardyeeks V2.4_z_drive_tensioner_mod is also supported: install the Panzerballs from folder '02-Optional_z-Drive-Mod/*.stl' Screws as Voron Spec build Credits go to edwardyeeks.
150 downloads
-
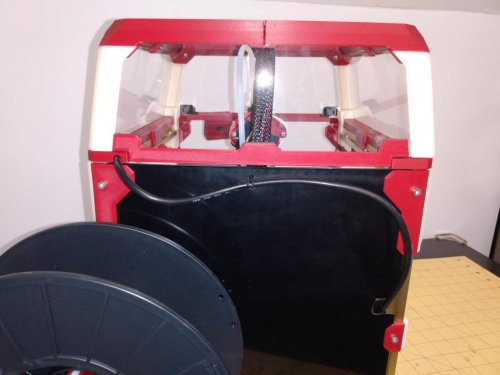
Back Plate
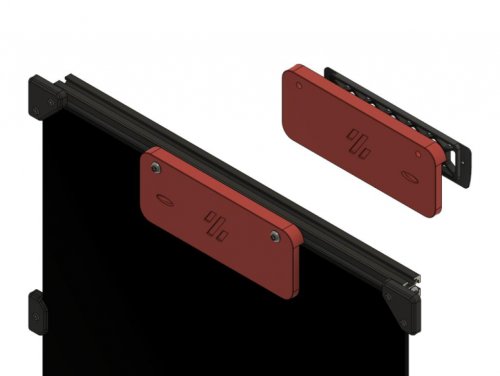
Back plate blanking plate
If you choose not to use the exhaust - perhaps you're planning on fitting a nevermore instead. This is a blanking plate with integrated bowden tube route that goes in place of the exhaust filter housing. It makes use of the existing grill with one strut removed (use the stl here or cut out a strut of a grill you already have printed) as I liked the look of it.
Instructions
Choose the appropriate blanking plate, the depth should be that of your back plate including the foam (distance from the flat of the extrusion to the flat of the back plate) Put foam on the edges of the blanking plate that contact the back plate and extrusion Cut out a strut from the exhaust grill or print a new one 2 x M5x16 (for the 5mm variant) 2 x heatset inserts into blanking plate Existing M5 T-Nut and M3x12 bolt from exhaust filter housing Ream the bowden path and push the tube through, it is a tight fit Thread the tube through the grill before attaching to your extruder, not that I would have done that, oh no Tighten it all into place Installed
Ignore the missing m3 screws holding the grill in place, it's because the led bar interferes.
704 downloads
(0 reviews)0 comments
Submitted
-
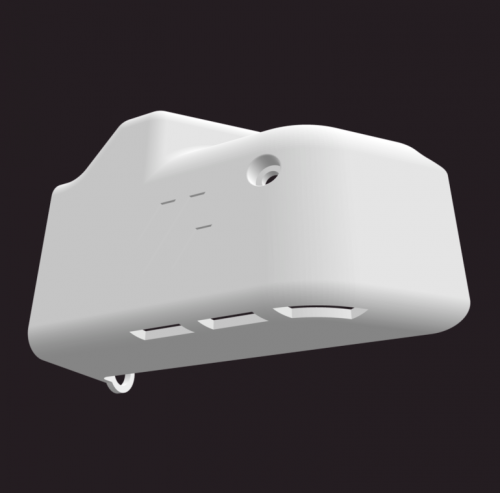
Afterburner Toolhead Cover - Clockwork
Afterburner Toolhead Cover - Clockwork
252 downloads
- afterburner
- clockwork
- (and 3 more)
(0 reviews)0 comments
Submitted
-
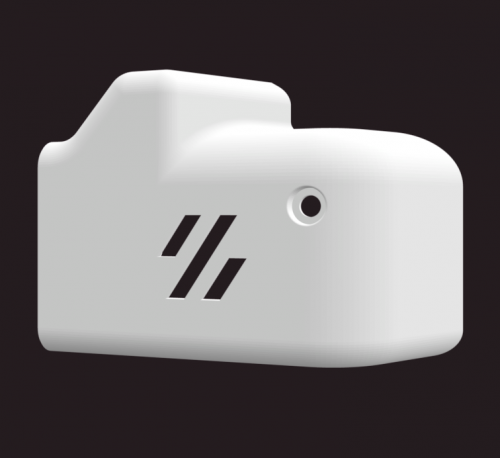
Afterburner Toolhead Cover - Galileo
Afterburner Toolhead Cover - Galileo
144 downloads
- afterburner
- galileo
- (and 1 more)
(0 reviews)0 comments
Submitted
-
Voron Zero (VOV0) toolhead
Based on HeVort extruder( By MirageC with Big thanks to Him on this awesome design )
How to print supported parts to VOV0 tool-head
https://www.youtube.com/watch?v=CkwsMm29IuA
Print Setting
download the pre-supported .3mf file choose for support enforce only 3 perimeters 5 solid top 5 Bottom layers BOM
BMG kit
2x M3X8mm
2x M3X10mm Button head
2x M3X40mm (FanDuct)
2x M3X25mm
1x M3X20mm
2x dragon / mosquito 2.5mm screws
7x heat brass insert (BOM insert)
/// LDO Nema 14 Motor https://fr.aliexpress.com/item/1005002900085330.html
/// BMG Kit with and without motor https://fr.aliexpress.com/item/1005002487451377.html
/// Plastic PTFE Bowden fitting https://fr.aliexpress.com/item/1005002487819739.html /// M3 Heat insert https://fr.aliexpress.com/item/4000761483243.html
Appreciate my work ?
buy me a coffee
https://www.paypal.com/donate/?hosted_button_id=9EL8CEDVY28DA
thank you and happy printing
1,681 downloads

-
Most Actively Discussed Mods
-
Hottest Files!
.thumb.jpg.2c879d60315f8d86612bb06a137c204a.jpg)

