All Activity
- Past hour
-
 Geoffrey joined the community
 - Today
-

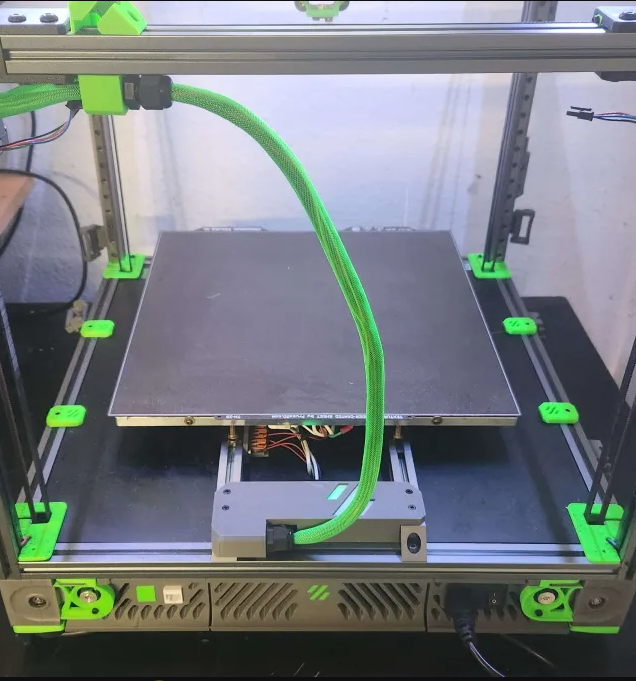
Milo V1.5 CNC Bench Mill - Water Cooled - Casa Enclosure
PFarm replied to PFarm's topic in Build Diaries
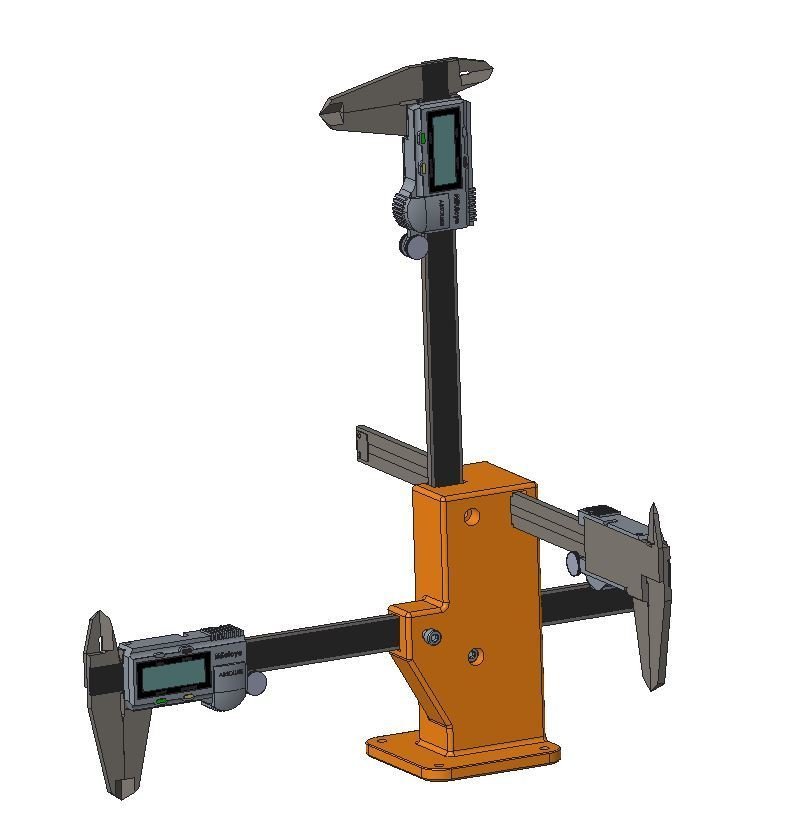
Found this handy tool to calibrate your steps. Use an M4 nut and screw to secure the caliper to the tool. Steps Calibration Tool
- 262 replies
-
- 1
-

-
- selfsourced
- casaenclosure
- (and 2 more)
-
 The 300 mm with the updated Stealthburner is running ~200 mm/s @6K. My current problem is cooling and can be seen clearly on prints with overhangs that start looking bad after a few perimeters only on the back side of the printed object. Placing the object 90 degrees from the previous location will print that overhangs with better results. For example, for the Maker's Muse Torture Egg, I need to slow down the print job down to 45% speed to get good overhangs at the very bottom and top sections. The rest prints great at full speed.
 - Yesterday
-
 kerbik joined the community
 -
Music to my ears - there are other like me, Im no longer alone. Hey wifey - come read this!
-

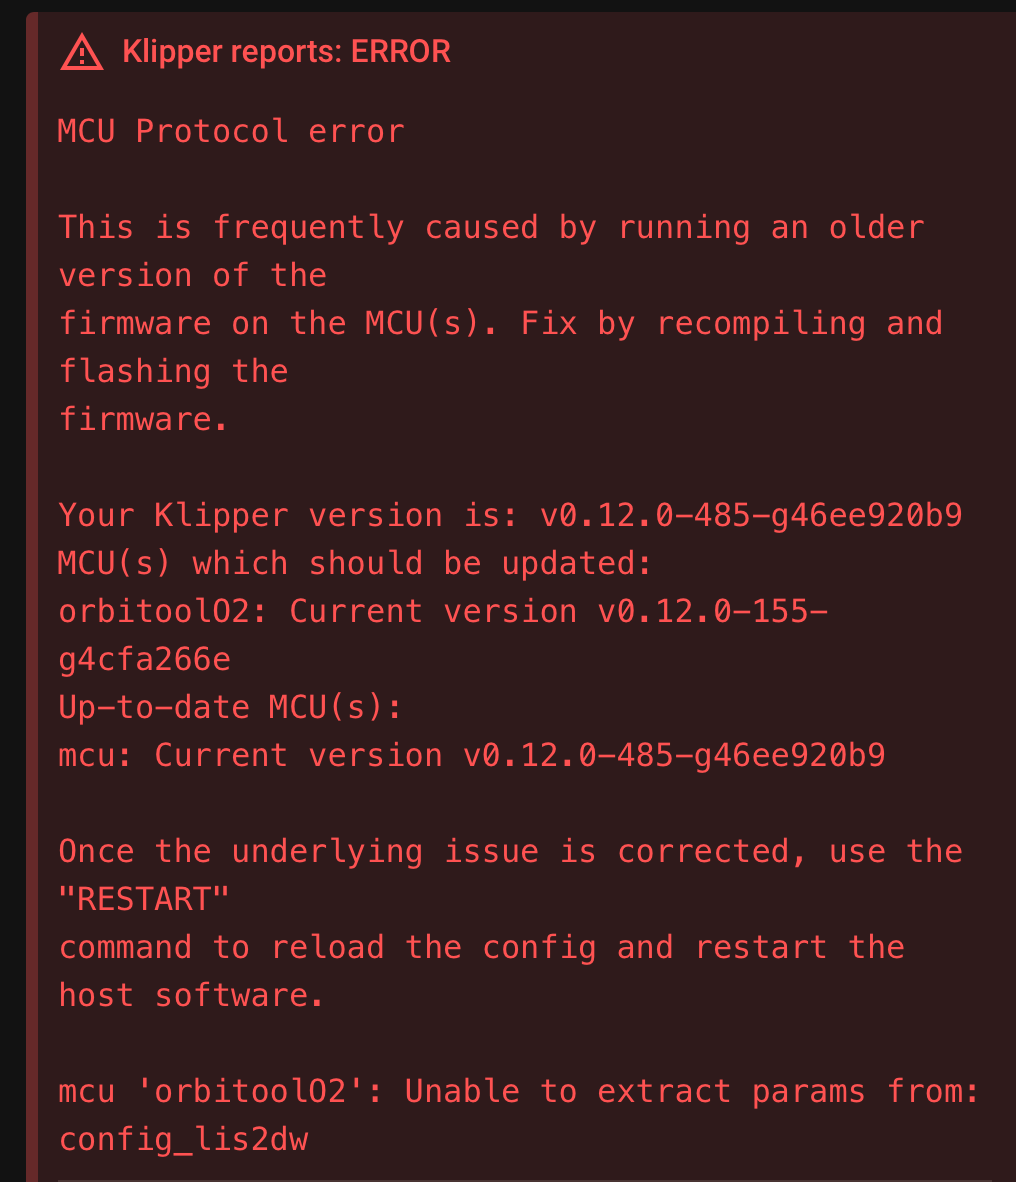
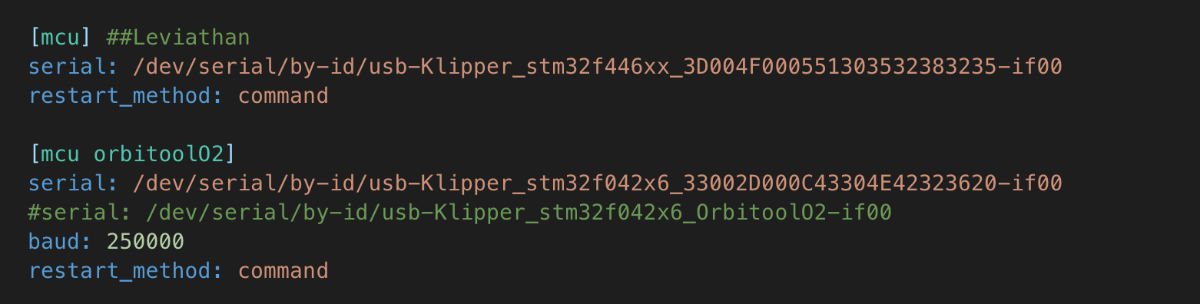
Dragonburner / Orbitool Toolhead board Problems
Hawley12 replied to Hawley12's topic in General Discussion
The solution for the past few days has been commenting out the [lis2dw] section in Printer.cfg. Other than that no ADXL in the cfg file. -
 smdowd joined the community
 -
Keri, when I tried first "defining" the PT1000 with three resistance/temp values, then declaring that defined thermistor in the configuration, it gave Klipper a fit. Wasn't until I got rid of the definition and declaration, and simply stuck "PT1000" in sensor_type and 2200 for pullup resistor, exactly as midmadn said, that things started working better. Apparently when you try to tell Klipper something it already knows, it gets testy! I can see how that jumper works - - slick way to implement different resistor values for different thermistors! I don't think such strict accuracy is required for quality prints; likely using a PT1000 for printing with plastics is overkill, like using a shotgun to deal with mosquitoes, given that printing temp ranges stated for any given filament are closer to ballpark estimates than to three decimal-place precision figures. I'll forget about the precision and just take advantage of the greater range. Yeah.... this is exactly the kind of rabbit-hole I'm far too prone to get sucked into! I get caught up in the technical side of it and forget about the 'diminishing returns' aspect. It's great fun when you finally figure things out and everything works, but if it makes no practical difference in the end, it's just for fun (or "funstration," as my partner-in-crime likes to call it, given the dearth of accurate and *complete* information.) I think consumer/hobbyist-level 3D printing is still in the "wild-west' stage, much like phonographs were back in the day, when each manufacturer did their own thing, records played at different speeds for different makers, etc - - took quite some time for any industry-wide standards to become established. Still, this printer is serving it's purpose; I spent three decades learning to troubleshoot and repair some fairly complex equipment, and hated the thought of losing those hard-won skills in retirement. For me it's more about tinkering with the technology than actually printing useable and/or fun stuff.
-
 I'm running sensorless, so no Y stop switch. I've got 4 motor wires in an umbilical from the centre of the gantry down to the hole in the baseplate.
 -
I have a Rapido 2F UHF with a PT1000 on my new LDO V2.4 I'm also running the Nighthawk 36 toolhead board. This is what I ended up with in my printer.cfg --------------------------------------------------- heater_pin: nhk:gpio9 sensor_type: PT1000 sensor_pin: nhk:gpio29 pullup_resistor: 2200 ---------------------------------------------------- Upon printing a temp tower - my findings are exactly the same as my other machines with lower grade thermistors. Best temp for Polymaker and Ambrosia ASA/ABS 255-260. Therefore I am satisfied with the settings and performance of the PT1000. No rabbit holes needed. Jack
-
 Not A Name joined the community
 -
 sobsmb changed their profile photo
 -
 ithriveontacos joined the community
 -

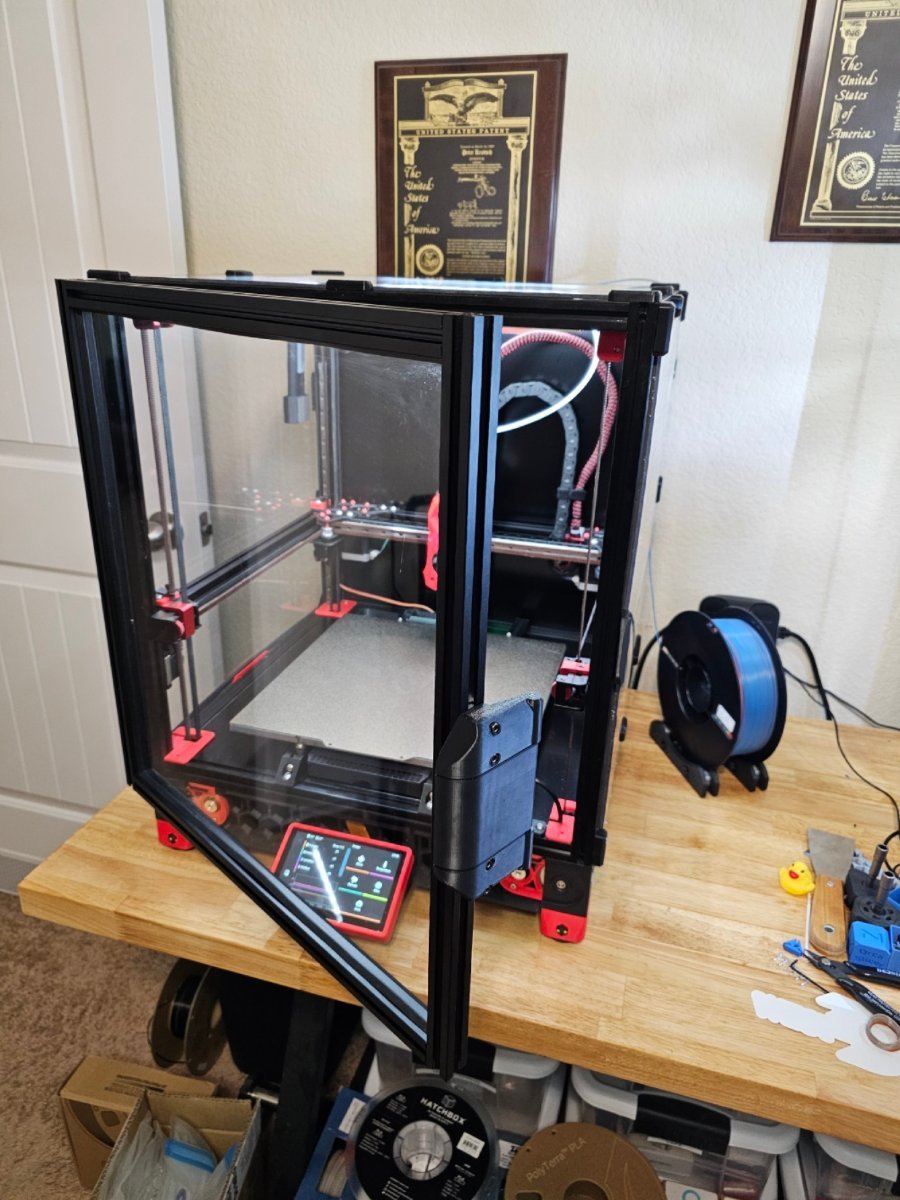
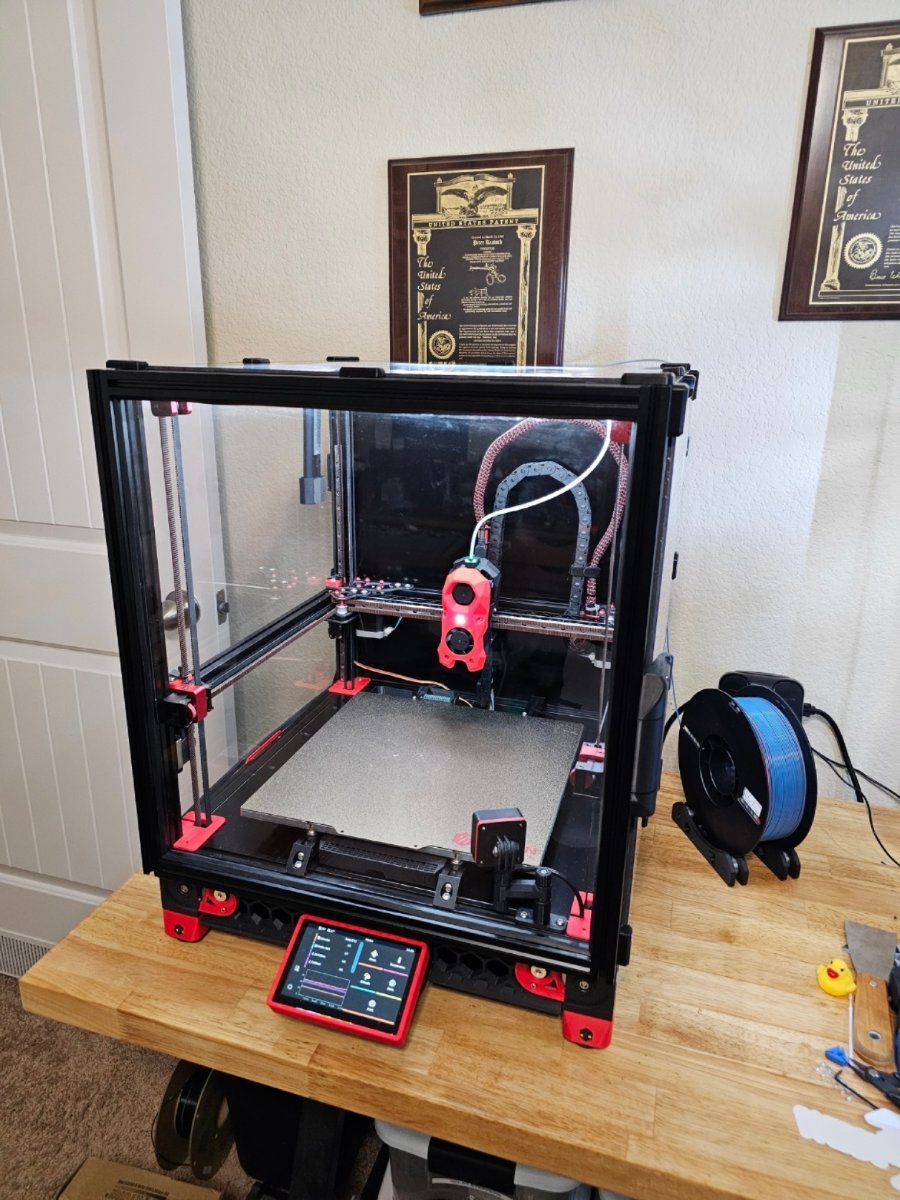
Voron 2.4r2 350 mm getting serviced & updated aka "Rabbit Hole"
Penatr8tor replied to NikosSprocket's topic in Build Diaries
I'm actually curious how fast your Voron can get. What are you going to shoot for? Currently I'm printing ~200mm/s @ 5K acceleration. -
Let's see how it will do under speed.
-
Dragonburner / Orbitool Toolhead board Problems
Penatr8tor replied to Hawley12's topic in General Discussion
Take a look at your printer.cfg and see if there is an "ADXL" section in there. If so delete or comment it out. Could be a conflict. If not... comment out both the lis2dw and resonance_tester sections and save & restart. Hopefully your machine boots without error. If it does... Then go back in uncomment the lis2dw section leaving the resonance_tester section commented and try again. When you get to the error... then you'll know where to look. Simple process of elimination is a powerful diagnostic tool. Fingers crossed, Hope this helps. -
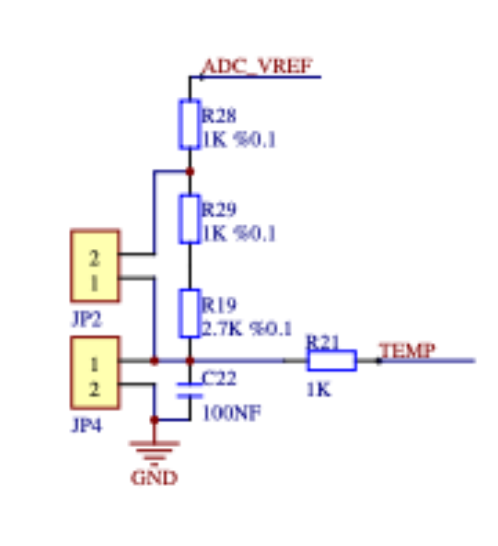
Hi! I just did this! The research was confusing. It seems that Klipper has built in tables for at least the following temp sensors: Generic 3950, ATC Semitec 104GT and PT1000. E3D, who made my PT1000, states that it will work with a standard 4.7k Pullup. It seems that my toolboard, the Mellow SB2040 was designed for use with either a standard 100k Thermistor or a PT1000 on the same input, having a separate input for PT100 sensors. The standard Hotend TEMP input is a 2-wire connector, JP4, with a standard 4.7k pull-up resistor as default. This serves for the standard 100k Thermistor types. If one uses a PT1000 sensor, a jumper, JP2, just above JP4, must be installed and Printer.cfg updated to "sensor_type=PT1000" and "pullup_resistor=1000" under the Extruder section. The nomenclature indicates that one might get a gross error of -180C if the jumper is not installed. So what does this jumper do? it shunts out 3.7k off the 4.7k total pull-up resistor leaving just 1k. One would normally leave the jumper off for standard thermistors. Other systems I've seen also use a standard 4.7k pull-up.... But not the Nighthawk! So, it seems that your Nitehawk board has a fixed 2.2k pull-up resistor. Perhaps just entering "pullup_resistor: 2200" and "sensor_type_PT1000" in printer.cfg under extruder will suffice ? Will Klipper do the math? I think, probably? For some reason LDO appears to think you should enter in a series of values to define your thermistor such as; "temperature1: 0, resistance1: 32116.0, temperature2: 40 resistance2: 5309,... etc. Unfortunately, their sample printer.cfg settings only include values for a generic 3950 thermistor. I suspect that you might have to find and enter the appropriate values for your PT1000. It seems that Slice Engineering publishes these values for their PT1000 sensor. It appears that E3D does not publish these values for theirs. Clear as Mud!
-
Dragonburner / Orbitool Toolhead board Problems
Hawley12 replied to Hawley12's topic in General Discussion
A TON I agree is being dramatic I was just discouraged but here is a screenshot of my current error and yes to my knowledge Ive SSH in and made and refreshed firmware but no luck so far.
- Last week
-
Much appreciated, guys. I wanted it so I could print with nylon and/or other hi-temp materials, but that's down the road apiece, 'til I build an enclosure. From what I gather, the PT1000 works well enough with standard pull-up resistor values, but the potential for closer accuracy is the deal with the 1K resistor - - ain't necessary, just opens things up a bit. Not sure how accurate the temps need to be, really; likely it's a case of 'close enough for government work.' If it doesn't work out for some reason, I have a bagful of 'standard' 104NT thermistors I can switch to!
-

Voron 2.4r2 350 mm getting serviced & updated aka "Rabbit Hole"
mvdveer replied to NikosSprocket's topic in Build Diaries
Mod it to a horizontal chain mod - takes 10 minutes (not including printing the parts). Will also free up space in Y and prevent the toolboard from hitting the cable chain: My Voron 350 My Voron 300 Or you can do a horizontal Z umbilical - for me that was too much effort for little gain. (Have to re-wire and crimp the two motor leads) This is from hartk:
-
 IXsnoopyXI joined the community
 -
One last mod to finish up the project. Clicky-Clacky Door Mod. And... The printer is now in my office and printing beautifully. Printed parts... These were printed on my VzBot. Material Polymaker ABS Black, 5 perimeters, 5 top, 5 bottom and 30% cubic infill, no supports, no brim. Bed 110, HE 240, Outer walls and top surfaces 200mm/s 5K accel. All other walls infill etc. 250mm/s 10K accel. Travel = 800mm/s 20K accel. Print time = <3hrs I put all this print info up here because I'm curious to see how fast others are printing ABS. And of course, the quality is not bad.
-
I have a Phaetus Rapido V1 running a PT1000 that plugs into a BTT EEB2209 tool head with a 4.7k ohm resistor. I have no issues with temp at all. I have never tested it with a thermocouple so If it’s exactly accurate I can’t say. I just calibrate the filament to the system and get great results no matter what filament I print with. The filament temperature calibrations work on two different printers, one with a regular thermistor, and the prints turn out the same. If I had another printer with the same tool head board, I’d like to test it out just because. good luck and don’t forget to have fun! (Not my quote) lol
-
Voron 2.4r2 350 mm getting serviced & updated aka "Rabbit Hole"
Penatr8tor replied to NikosSprocket's topic in Build Diaries
Interesting toolhead no doubt. -
This is just my opinion and experience. Take it with a grain of salt. If you like this sort of rabbit hole then you go buddy! I have 2 printers running 1st gen Rapido hotends with standard 104NT4 thermistors, one printer running a Rapido 2+ and one running a Goliath hotend. Both are equipped with PT1000's. The big question for me whenever there's a potential rabbit hole to explore is... 1. Is it worth it? 2. Will it improve my prints? 3. Will it let me print with higher temp materials? Based on my experience... PLA? 1=Nope 2=Nope 3=N/A ABS/ASA? 1=Nope 2=Nope 3=N/A PETG? 1=Nope 2=Nope 3=N/A TPU? 1=Nope 2=Nope 3=N/A Exotic High Temp Materials? 1=Yes, 2=Maybe 3=Yes These are just my shoot from the hip observations. Normally when I do an upgrade to a new hotend... I'll choose the one with the best thermistor etc but is the thermistor driving my purchase? No, I just don't print with those materials because I don't need to for the most part and If I'm going to go down a rabbit hole... I generally tend to go down the wrong ones.
-
 MikeD82 changed their profile photo
 -
How? There are still 2 motors (X & Y) and the Y stop switch wires to contained.
-
 EricB joined the community
 -
 Raeeres joined the community
 -
Maybe @ChicagoKeri can help you with this.
-
Hey Folks! Now that the Klipper is happy with my config files and appears to be fully functional, I'm wondering about a short article I read concerning the pullup resistor best used to realize the full accuracy potential of a PT1000 thermistor. Typical default resistor is usually a 4.7K (?), and the Nitehawk toolboard in my machine has a 2.2K. The article stated that the best possible resistor to use with a PT1000 is a 1K, 0.1%. TINY little thing, an 0402-size SMD on the Nitehawk. Not the easiest things to find, either, as everyone wants to show you plenty of ONE% resistors. I find myself wistfully recalling the days when Alta Vista was the premier search engine, one that actually paid attention to your search terms and fully utilized Boolean operators, which are largely ignored by today's search engines... and don't get me started on Amazon's or Home Depot's search engines. Ask for anything, and you'll be shown everything, *including* the kitchen sink! I feel so much better now! I read the article on the TH3D site, here: PTt1000 article It's brief, and I'm not taking it as a sales pitch, since it's talking more work, and they aren't selling the resistors. Just wondering about the technical accuracy, or necessity for, that 1K resistor??
-
 VikingTraveler joined the community
 -
It looks even better if you get rid of the final (vertical) chain as well.
-
 michaelaswood changed their profile photo
 -
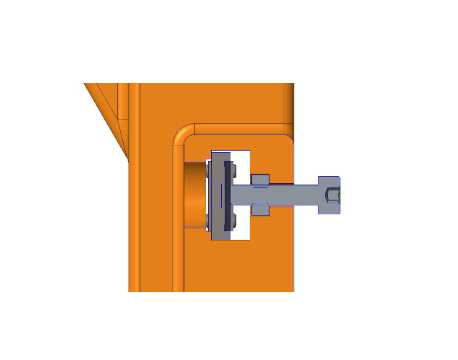
The Voron version also uses 2-4 stainless steel M2.5x6 screws.
-
The V6 has the extra mass in the collar and looks pretty thick near the bottom (hot) side. I wouldn't think it would be more than double.
-
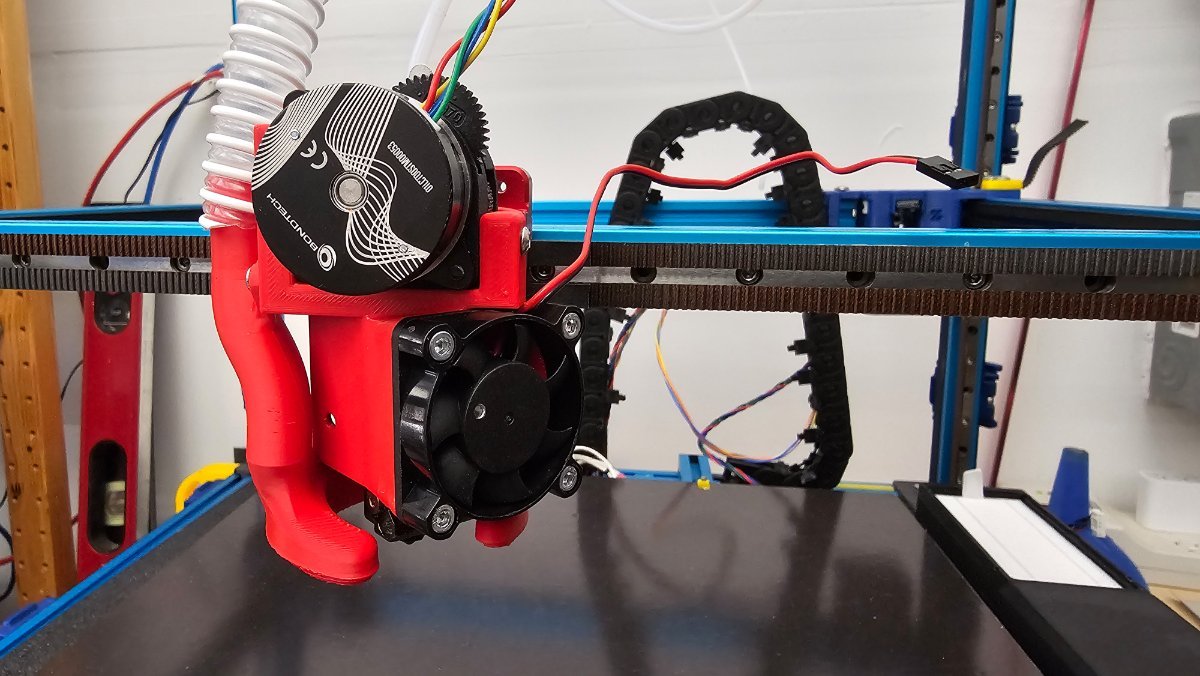
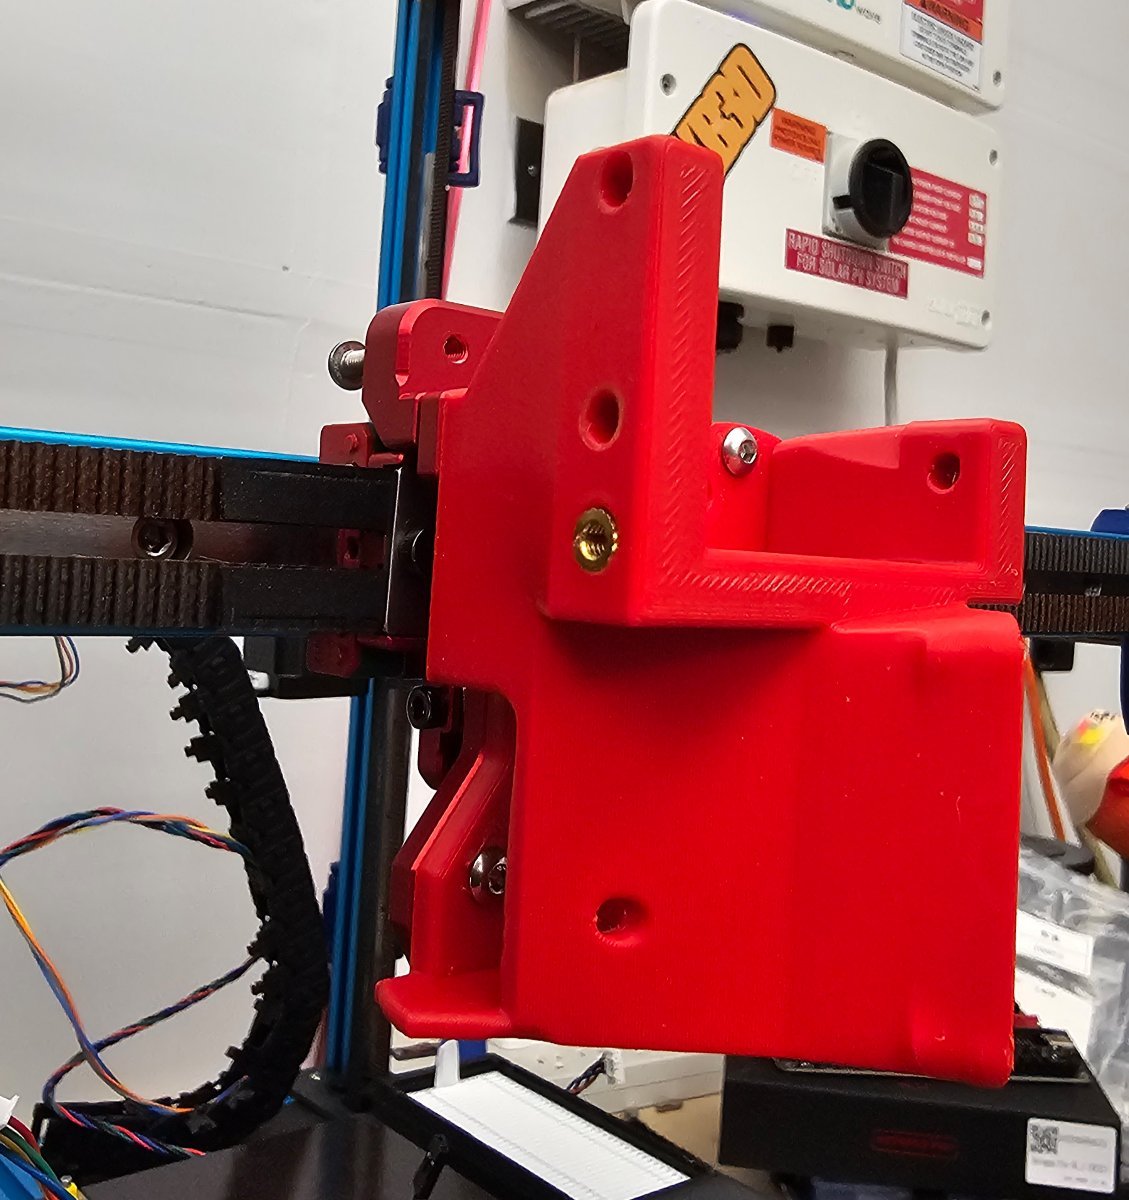
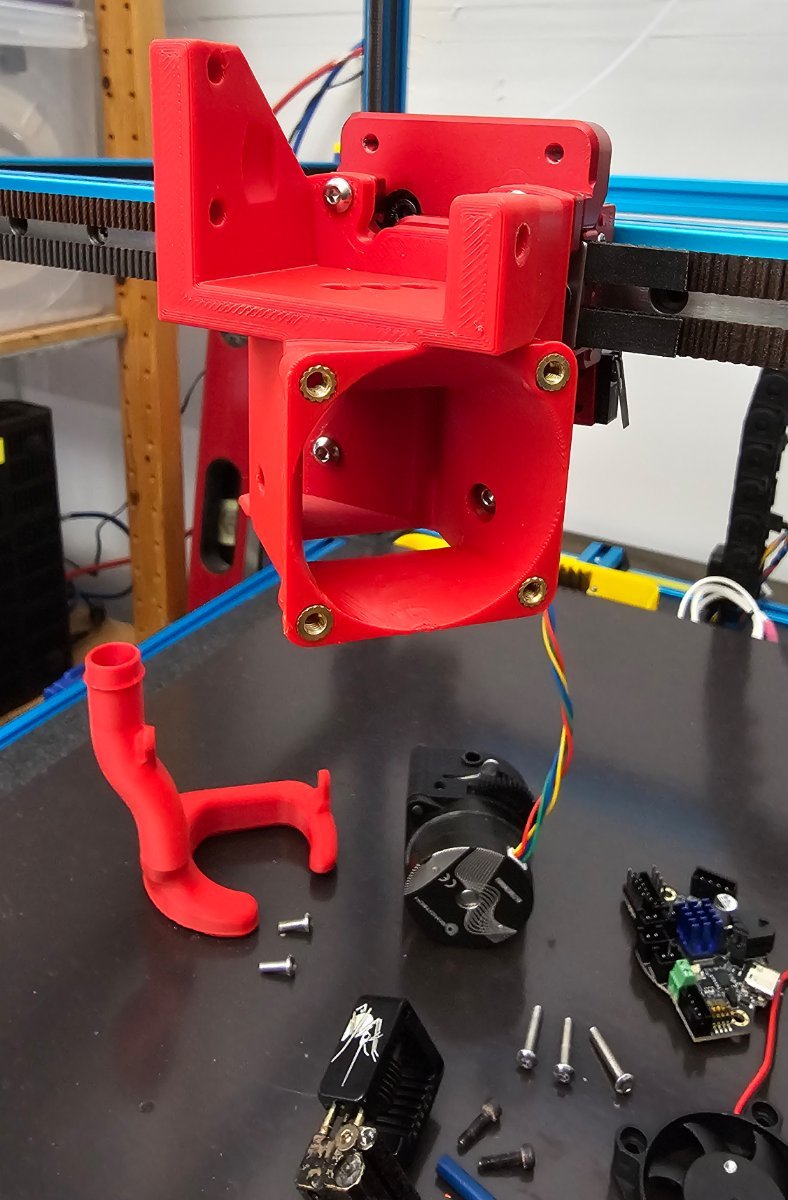
Functional head completed and ready to test. Some stats: Extrusion nozzle to linear rail carriage 28 mm (Stealth 28.10 mm) Overall width 84.966 mm (Stealth 85.216) Height from nozzle to Extruder lever 105.357 mm (Stealth 145.063 mm). 3 printed parts for everything; no cosmetic or LED/camera mounts yet! Need to add the EBB36 CAN holding frame and wire everything before for 1st run. Some images: It's amazing how "clean" it looks with the 2 wire chains gone! Hopefully, it actually works too! Cheers!


-
Recently Browsing
-
Member Statistics
-
Our picks
-
Top Picks for FDM Printing Enthusiasts This Week on Team FDM
At Team FDM, we always keep a keen eye on what our community is buying. It’s fascinating to see which tools and materials are becoming essentials in your toolkits. This not only helps us understand your needs better but also allows us to discover new and exciting products that we might not have considered before. I wanted to share all of this with everyone in the community to get some feedback and hopefully give you insight into what is popular with others in the community!
Here’s a look at this week’s most popular items, ranked by the quantity ordered, to give you a glimpse of what fellow enthusiasts are using:
Engineer Square Machinist Square Set: A must-have for ensuring precision in every project, this tool has been a top choice for its reliability in checking the right angles on frames and parts.
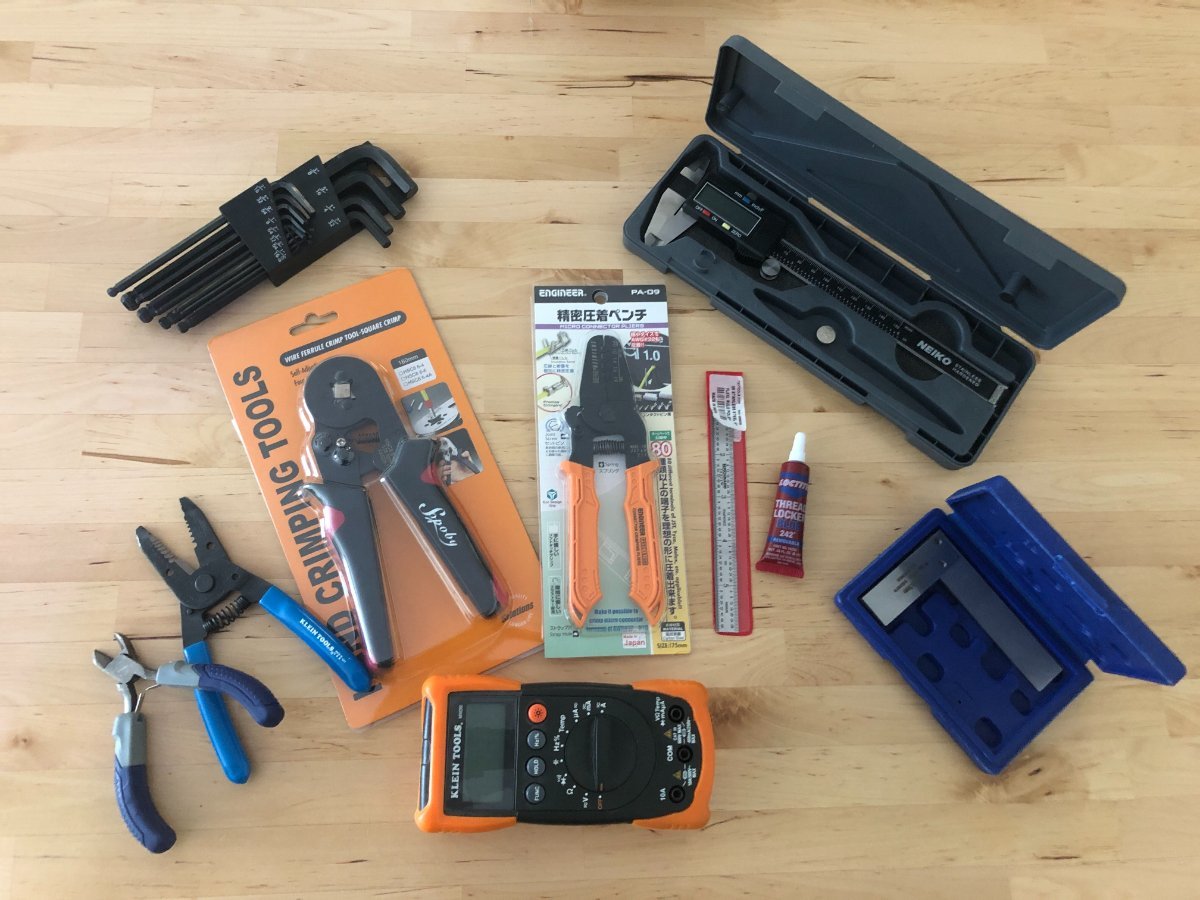
iCrimp IWS-3220M Micro Connector Pin Crimping Tool: Essential for those involved in electronics within FDM printing, this tool has been widely adopted for its versatility in handling a range of wire sizes, making custom wiring setups easier than ever.
YIHUA 926 III 60W Digital Display Soldering Iron Station Kit: This comprehensive kit provides all the essentials for soldering, proving indispensable for making or repairing 3D printer parts and other electronic components.
FLASHFORGE ASA Filament 1.75mm: Known for its durability and high UV resistance, this filament is perfect for outdoor or functional prints, with the Burnt Titanium and Sparkle Sky Blue variants proving particularly popular.
WERA 05118066001 2054 Screwdriver for Hexagon Socket Screws: Precision is key in FDM printing, and this screwdriver is highly valued for its exactness in fastening and adjustments.
Arducam for Raspberry Pi Camera Module 3 12MP IMX708: A fantastic tool for integrating high-quality imaging with 3D printing setups, allowing for detailed monitoring and time-lapse creation of prints.
VISEMAN 6" Mini Needle Nose Pliers: These pliers are perfect for manipulating small and delicate parts, a frequent necessity in FDM printer maintenance.
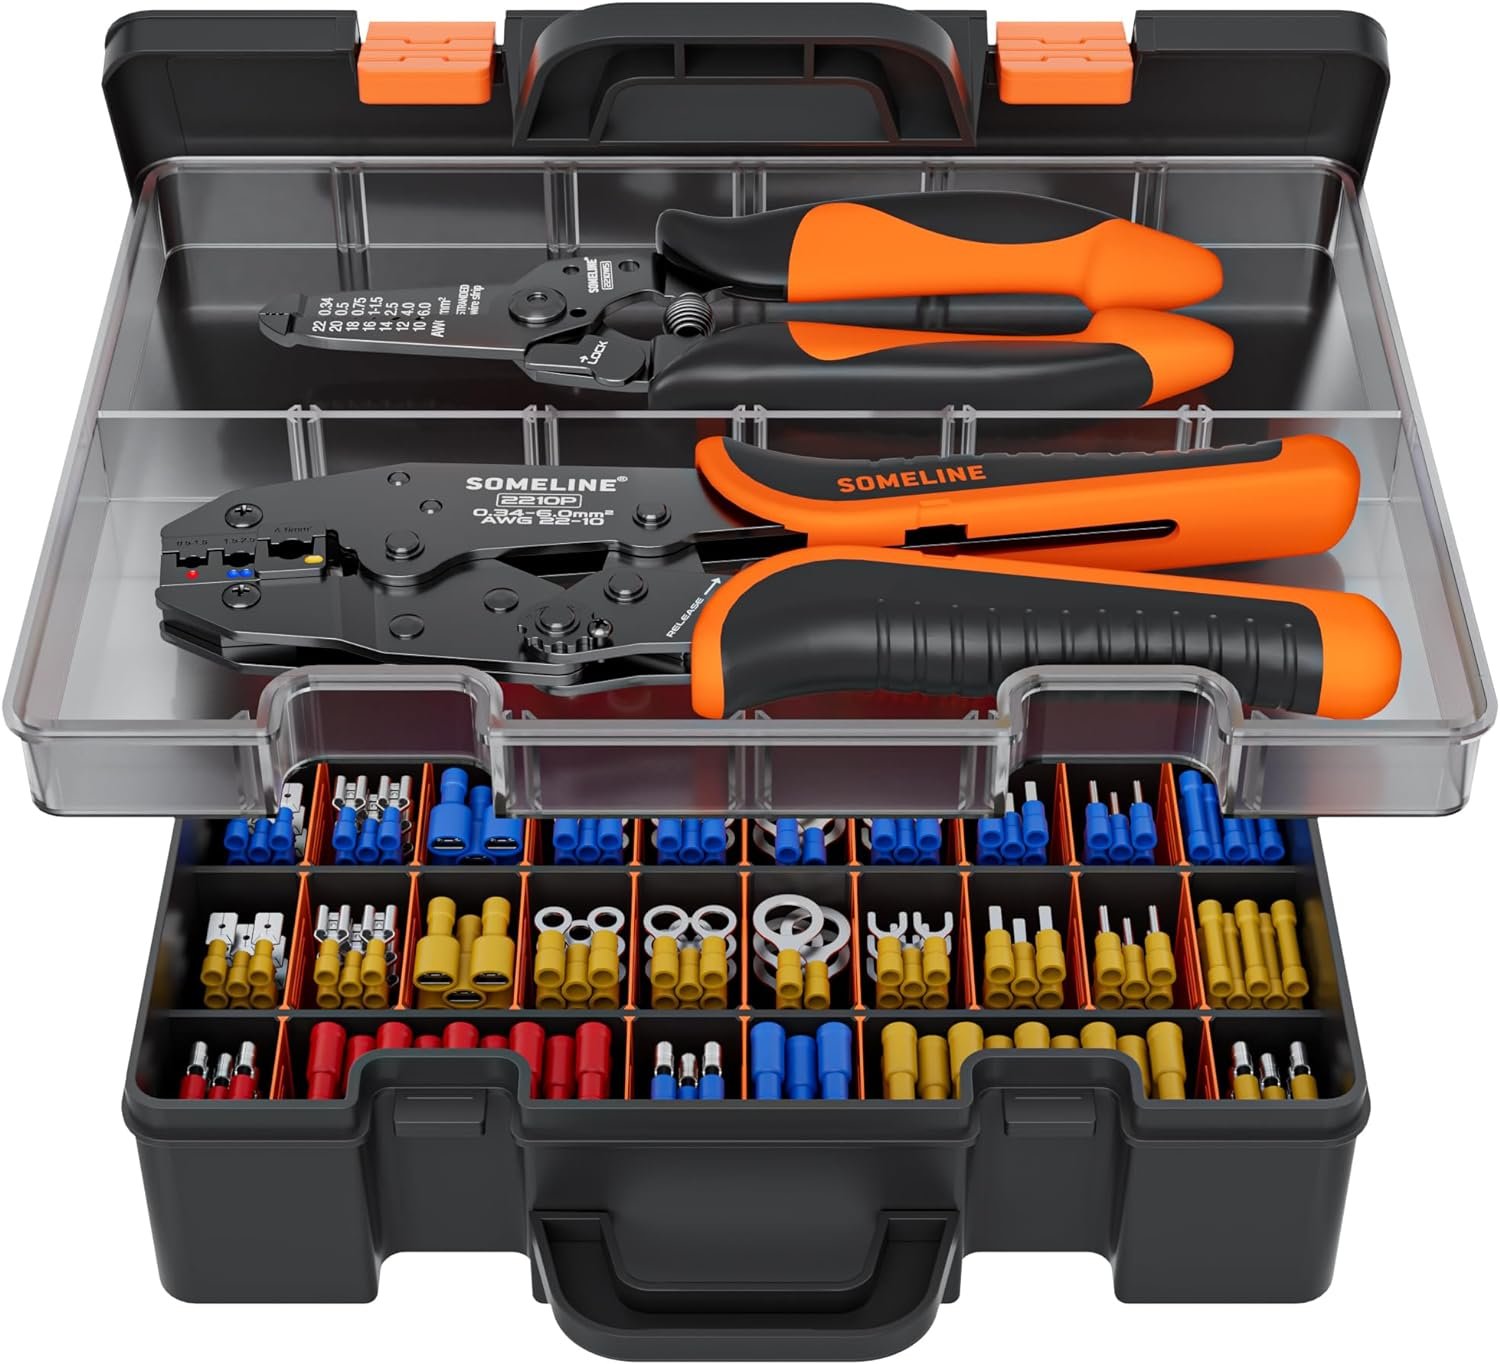
SOMELINE® Electrical Connectors Crimping Tool Kit: With a variety of connectors included, this kit is essential for anyone needing to manage electrical connections safely and efficiently.
Nano Polymer Adhesive (120ml): This adhesion solution is becoming increasingly essential for achieving perfect first layers in 3D prints, minimizing warping and adhesion issues.
By tracking these purchases, we not only cater better to your needs but also occasionally stumble upon gems that might have otherwise gone unnoticed. Each product here has been chosen for its proven utility and popularity within our community. Whether you're upgrading, replacing, or just starting, these tools are sure to enhance your 3D printing experience.
-
-
- 4 replies
-
-
New Voron 0.2 Release
Voron Design just announced the official release of the Voron 0.2 3D printer. This compact and portable machine has a 120x120x120 build volume and utilizes a CoreXY design. It features a low mass direct drive extruder and an enclosed chamber, as well as a 24v DC bed and Klipper firmware.
One of the major highlights of the Voron 0.2 is the new Mini Stealth Burner toolhead, which supports the Revo VORON, Dragon, Dragonfly BMO, DropEffect XG, and Creality Spider Pro. The drive units have also been updated with a reduction in motor screw count and the removal of the endstop for sensorless homing.
In terms of the frame, there have been no changes from the previous version. However, the tophat has undergone some significant updates, including an extrusion-based design with hinged panels and cam locks to secure it in place. All panels are 3mm thick and the side panels are now identical.
The X/Y joints have also been modified, with the tops becoming 1mm smaller to accommodate the Mini Stealth Burner and the endstop block removed for sensorless homing. The bed assembly has undergone some changes as well, with the printed parts being updated and the bed position moved 3mm to the rear.
Finally, the feet/skirts have been updated with the inclusion of the Trident skirt community mod, and the front idlers now have cam locks added.
If you are upgrading from the V0.1 version, be sure to check out the configurator on the Voron Design website for a list of necessary parts.
We hope you enjoy the new and improved Voron 0.2 3D printer!
-
- 8 replies
-
-
Voron Build Tools Mega-List - 2024 Edition
Researching, purchasing the printer parts of the build list and waiting for parts is only half of the battle. While many Voron builders have many of these tools on hand, and we hop most have familiarity with soldering, there are some tools that make the job MUCH easier, safer, and provide professional quality results.
This is the Mega List for all the recommended or required tools for your Voron build.
First and foremost, crimper are really important for your Voron build. With the amount of wiring required, you will thank yourself to invest in high quality crimping tools. Frequently users ask if tinning and soldering joints is an alternate option. While it may work short term, this is a much greater risk of the joint failing. Typically this is due to the stress of movement, or weakening from the heat created inside the enclosure and around the hot-end during printing.
-
-
- 83 replies
-
-
Voron Kit Recommended "Suppliers"
This post will be continually updated with the latest and great known information regarding available Voron "Kits". As, clearly defined in any communications, The Official Voron Design does not recommend or prefer any of these vendors. The list here is only identified as those vendors who have been identified as successful builds and full kits that are available.
Purchase kits at your own risk, knowing that parts can change, often times for the worse, and as is true with my Chinese parts, Meanwell PSU labelled as such, does not mean it's a legitimate Meanwell PSU, same thing with other popular components (like Gates belts) and fasteners.
While these are not in any specific quality order, they are in order of popularity and availability.
Note: for best results order from AliExpress from user who have the MOST sales - likely they are the best sourced Kits with the fewest flaws.
Additionally, and perhaps most importantly for this thread - Yes, sourcing your own parts will increase your build quality, and verify proper function and fitment. This thread is NOT a discussion on pro's and cons of sourcing parts vs buying kits 😃. Let' try our best to stay on topic!
Voron 0
Formbot - AliExpress
Voron 1.8
MagicStudio - Direct Website
Voron 2.4
Formbot - AliExpress <- Most Common 2.4 AliExpress Kit
Fystec - AliExpress (Pre-Order)
DigiMach - https://store.digmach.com/collections/voron-kits
Voron SwitchWire
Formbot - AliExpress
Voron Legacy
Funssor - AliExpress
If you have any direct experience or would like to suggest another kit for this list please respond in the thread and the thread will be updated!
-
-
- 37 replies
-
-